Wednesday, December 28, 2011

Molasses Spice Cake


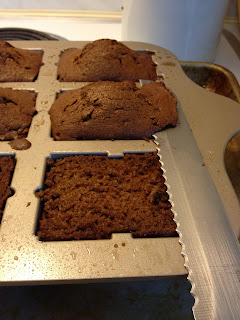
This past summer, my mother and I were puttering around in our local Goodwill shop looking for inexpensive booth supplies for a craft show we were participating in.  Although we didn't find what we were looking for, we did come across a sweet little train cake pan for $.99 ($36 at williams-sonoma.com how's that for a steal?)  We immediately snapped it up with hardly a second thought.  It was in perfect condition, no sticky spots or weird smells...it looked like it had probably never seen the inside of the oven.  Today, I decided to put it to good use and I am so glad I did.  I made the most delicious, soft, crumbly, moist Molasses Spice Cake with it.  Because it's my own recipe, I am going to share it with you right here.  You should definitely make this one, you won't be disappointed!  If you don't have the world's cutest train cupcake pan, then you can fit this in two 8" round cake pans or a lasagna pan or even regular cupcakes.  Mmmmmmm it smells so yummy in my house right now!  What a perfect treat to ring in the new year!


Molasses Spice Cake
recipe by Kristi McDonough
(makes two 8" rounds or a dozen cupcakes)

Ingredients:
  • 2 1/2 cups all purpose flour
  • 1 1/2 teaspoons baking soda
  • 2 teaspoons ground cinnamon
  • 2 teaspoons ground ginger
  • 1 teaspoon ground nutmeg
  • 1/4 teaspoon salt
  • 1 stick unsalted butter, softened
  • 1 egg
  • 1/2 cup packed brown sugar
  • 2/3 cup molasses
  • 1/3 cup buttermilk
  • 2 teaspoons vanilla
  • 1 cup hot water
Directions:
Preheat oven to 350*

In a medium bowl, sift together flour, baking soda, salt, cinnamon, nutmeg and ginger.  Set aside.


Measure molasses and buttermilk in a glass Pyrex 4-Cup capacity measuring cup.  Add water and vanilla and mix well.


Place butter, brown sugar and egg in bowl of mixer and beat on medium speed until thoroughly blended and creamy, about 2 minutes.


Starting with flour mixture, alternately add flour and molasses mixture until cake batter is smooth. 


Pour into prepared cake pans.


Bake approximately 20 minutes for cupcakes and 8" rounds, 25-30 for lasagna pan.  Reduce heat to 325* if using glass or dark pans.


Slice the tops flat, if using the train pan or 8" rounds:
Turn out on a wire rack to cool completely before dusting with powdered sugar.
This cake pan could be perfect for a little boys birthday party, a baby shower, circus themed birthday party etc.  Here are a couple of pictures from google.com of some really creative cakes using this same pan.
Photo from trainparty.com
Photo from bridgestreetblog.blogspot.com


Speaking of parties, The Roo is going to be three in about a month, which means I have one heck of a fabulous birthday party to plan!  She starts preschool on January 3, which means she'll have a few friends to invite this time!  I better start thinking of age-appropriate games, I suppose!  Until next time...

-Kristi


Tuesday, December 27, 2011

Tutorial Link!

Last night I gave you all a little update about my Riley Blake tutorial, and as promised, here is the link for it!  I hope you love it and enjoy making your own portfolio.  Have a happy day!

-Kristi

Monday, December 26, 2011

Tutorial: Busy Kit for a Busy Kid

Hi!  Guess what?  I wrote a little tutorial for Riley Blake Fabrics and it's set to post tomorrow!  I am so excited for you guys to see it.  I must admit, it was a little tough squeezing it in with all of the Holiday hullabaloo going on, plus the crazy-abundant etsy orders (they just keep coming, yay!) and the Christmas present sewing.  But, I found the time and I managed to put together a cute little project that I think you will enjoy.  Especially if you have little crafty souls in your life.  How's about a little sneak peek?  Stay tuned tomorrow for the direct link...


See you soon!
-Kristi

Friday, December 23, 2011

Christmas Cookies


Yesterday was a day spent making four different kinds of Christmas cookies.  The Roo was so excited that I didn't have to sew because that meant we could play all day together coloring pictures of Herbert (her elf on the shelf) and baking.  I only kept a few cookies from two batches and gave the rest to my mom and husband to take to work for their friends.  I have already gotten several compliments, two people said that they were the best cookies they ever had.  WOW!!  Compliments like that make the late night and achy feet well worth it. 

We made Mini-Chip Snowballs, Peppermint Pinwheels, Snickerdoodles and "Peanut Butter Big Chocolate Chip", which is what Remy calls Peanut Butter Blossoms.  The Peppermint Pinwheels I discovered on Pinterest (of course, I LOVE that site!!)  Here is the original link and here is how Roo and I did it:


Ingredients

  • 2 1/2 cups all-purpose flour
  • 1/2 teaspoon salt
  • 1/2 teaspoon baking powder
  • 1 cup unsalted butter, softened
  • 1 cup sugar
  • 1 egg
  • 3 tablespoons milk
  • 1/2 teaspoon vanilla extract
  • 1 teaspoon peppermint extract
  • 1 tablespoon red food coloring
  • Powdered sugar, for rolling out dough
What To Do:
*Sift all the dry ingredients together in a medium sized bowl and set aside.

Cream butter and sugar together.  Add milk, vanilla, peppermint extract and egg and mix thoroughly.  You'll probably have to stop the mixer and scrape down the sides of the bowl, then finish mixing.  Add dry ingredients slowly and mix well. 


Scoop out half the dough and place in separate bowl.  Add red or green food coloring to the dough in the mixer bowl and beat well.

On a powder sugar covered/wax papered surface, roll out the colored dough.  (I learned after doing this recipe that you should shape your dough halves into rectangular logs and then roll them out to make sure they are as similar as possible.)  Carefully set this aside and repeat with white dough.  Gently slide the white dough on top of the green dough and press together.


Starting at the narrow end, carefully and tightly roll up the cookie dough.  Seal the end by pressing the dough together firmly.  Grab the dough in the middle and gently stretch slightly, continuing down the length of the dough.  It should double in length.


Now, keeping your dough log on the wax paper, dump a line of sprinkles along the edge of both sides and roll the log into it.  Press gently into the dough surface, making sure the whole thing is covered.  Wrap tightly in the paper, twist the ends closed and place in the freezer for an hour or so. (Oh!   Also, I didn't have a long enough piece of wax paper so make sure yours is extra long or you will be discovering sprinkles in your freezer, drawers and floor for days!),


Once the dough has set, cut it in 1/2" slices.


Bake at 375* for 10-15 minutes (depending on how thick you cut them).

(Don't worry, it does wash off!)

Let cool on a rack and enjoy! 


We had a lot of fun making cookies together.  I remember the day that we found out she was a girl, the first thing I said was "I'm going to teach her how to bake!  We're going to make cookies all the time!"  I love the time I get to spend with my little girl.

Merry Christmas!
-Kristi

Wednesday, December 21, 2011

FINISHED!!!


Thank you, thank you to all of my wonderful Etsy customers!  You have kept me busy and happy this Holiday season.  I was able to buy my husband a really awesome gift for Christmas without him knowing about it because of you.  I wish I could tell you what it is, but I have no idea if he reads my blog or not.  I don't want to risk it, you know? 

Anyway, this was just a quick post to give you a little something to read.  I'll leave you with a picture of the stocking I created for Prudent Baby's "Put A Serger In My Stocking" Contest.  It didn't win but I am, nonetheless, proud of it anyway.  It was inspired by my favorite Christmas song  (which you can read about right here ). 


Have a fantastic day!  I won't take so long next time.

-Kristi-

Thursday, December 08, 2011

Who Am I?

Why is it that the about me section is always so intimidating to write?  This is a part of my blog that I must have attempted about a thousand times with no success.  The other night, I was still perplexed and was wracking my brains about it when I went to bed.  I restlessly laid there, turning over and switching positions until at last I finally fell asleep.  About an hour later, at 2:00am, I woke up with an idea.  Immediately I got out of bed and practically ran down the hall to the living in room in search of pen and paper.    I had finally figured it out.  A LIST!!  I love lists! I write them constantly, I lose them even more frequently.  I write lists of my lists! I write lists to plan Thanksgiving dinner, then lists for the ingredients in the recipes that I'm using, then lists for the grocery aisle.  I go to the grocery store every Thanksgiving with no less than four lists.  I write lists to pack for a trip.  It's not that I'm that organized, believe me I'm not, it's just that lists help me get the job done, they help keep me on track, they remind me of all the thousands of things I have to do, want to do, should be doing, would rather be doing etc.  You get the idea.  

 Me and Remy October 2011


The best way for me to tell you about me is with an ever-growing, always changing, constantly evolving list.  I will be adding to it all the time, so be sure to come back and take a look.  Of course, if you can think of something to add to my list, leave me a comment or an email and I'll add it, with credit to you, of course.


Thanks for stopping by and reading my blog!


-Kristi-

PS Check out the about me section by clicking here or on the tab on the top of the page.

Wednesday, December 07, 2011

Holy Cow My Legs Are Tired!


For the past couple of weeks I've been trying to convince myself that I really do love runnning and that I really want to go for a jog with my husband sometime very soon.  Problem is, not only are our schedules comepletely booked and finding the time to go when it's not pitch black out is difficult, but also he used to be a soccer player (he even played for Team USA when he was younger) which means that he's used to running around for 90 minutes at a time.  Me?  I can barely go 9 minutes without wanting to barf up my lungs.  Nonetheless, we finally made the time and-thank you so much, Nike-just did it.  We went for a run in our neighborhood yesterday. I gotta say, it was pretty nice.  The running part sucked, of course, and the whole I'm-not-dizzy-I'm-just-vertically-challenged-is-this-normal-holy-cow-I'm-dying part was pretty awful but the walking part sure was nice!!  We found a woodsy trail in our neighborhood and even The Roo enjoyed herself!  She got to go "real shasht" (Roo speak for 'fast') in her stroller. 

I'll tell you what, I'm not usually one to set any expectations on a situation, any situation, so all of the dreaded thoughts and feelings of anticipation of how much it was going to suck made it just a little bit easier.  I made it through, Hubby didn't run like an athletic maniac and he was very encouraging.  As soon as we got home, I downed about a gallon of water while he made us a healthy lunch.  We plotted our next jaunt as we ate.  These are the kinds of things I need to be doing with him.  Small little bits of time where it's just us, making an effort to better ourselves with each other as encouragement. 

I am already looking forward to the next time we go.  I am hoping I will be able to push myself to go just a little further.  I am also hoping that it won't happen again until tomorrow (or the next day or the next day!) because OH MY WORD my legs are sore!  But, that's because I went for a two and a half mile power walk, up and down steep hills while pushing the wee one in the stroller.  We went to the library and picked up a stack of a thousand pounds.  Books!  I meant books.  I had about twenty on hold that went straight to the bottom of the Mutsy and away we went!  Back up and down those darn hills where my poor shins screamed in agony every step of the way.  Feel the burn, Shins, feel the burn!  They don't call this area Lake Hills for nothing!  I wonder if I can take a flatter route next time?  Who am I kidding...

Anyway, I am feeling pretty good today.  I even bought a book on blogging.  I'd like to make this something worthwhile.  The Roo starts preschool in less than a month (eep!) and I will need to use my time wisely.  I have a few goals for 2012, blogging is just one of them.  How about you?  What are your biggest, proudest recent accomplishments?  What are your goals for 2012?

-Kristi-

Wednesday, November 30, 2011

It's A Marshmallow World


I love marshmallows.  I love 'em covered in chocolate, rolled in coconut, dunked in hot chocolate, straight out of the bag, smooshed between graham crackers and I even love those little dehydrated ones in my cereal. So, naturally, one of my very favorite Christmas songs is "A Marshmallow World", which I had never heard until a few years ago.  It ranks up there with that hippopotamus song, and "All I Want For Christmas Is My Two Front Teeth".

In the spirit of the holidays, and the fact that we seem to be out of anything yummy to eat in this house, I made marshmallows.  I don't remember where I got the recipe, but I'm going to share it with you anyway.  You should definitely make them this year.  They are amazing by themselves and totally out of this world in a cup of hot chocolate.  In fact, what a thoughtful holiday gift for someone on your list!  Wouldn't it be nice to receive a basket with mugs, cocoa mix, a few candy canes and a bag of homemade marshmallows?  Add in a movie and some popcorn and you've just given an awesome night out at home!  Enjoy!

-Kristi-

PS What is your favorite holiday treat?


Homemade Vanilla Marshmallows
makes about 40 1 1/2" super yummy treats

2 1/2 Packets of unflavored gelatin
1 cups cold water
1 1/2 cups sugar
1 cup light corn syrup
1/4 teaspoon salt
2 tablespoons vanilla extract
powdered sugar

1.) Whisk gelatin and 1/2 cup water in your mixer's bowl.  Let sit for about 30 minutes while you are working on the next step.
2.)In a small pot with candy thermometer attached to the inside, mix remaining water, sugar, corn syrup and salt over low heat until sugar is dissolved.  Once sugar is dissolved, turn the heat up to high and cook, stirring constantly, until temperature has reached 244*, the firm ball stage. Immediately remove from heat.
3.) Working quickly, transfer sugar mixture to gelatin.  Beat slowly until evenly combined.  Gradually increase the speed of your mixture to high (between 6-8 on a Kitchenaid) and let beat until mixture has tripled in volume.  This will take about 15 minutes. (While you are waiting, be sure to soak your pan and utensils in hot soapy water!)  Add vanilla carefully as it tends to splatter.
4.) Dust the bottom of a lasagna pan with powdered sugar.  Pour mixture into pan and spread evenly.  Dust top with powdered sugar, coconut, sprinkles, cocoa, chopped nuts, mini chocolate chips etc.  You may also choose to add one of these to the bottom of the pan after dusting with powdered sugar. Let stand uncovered for several hours (or overnight).  Cut into 1 1/2" squares, toss in powdered sugar or sprinkles or whatever you used on top and bottom.

*Since my marshmallows are still in the "overnight" stage, I'll come back and edit this post with pictures after the marshmallows are finally cut.

Thursday, November 17, 2011

Turkeys and Toddlers

The Roo is just getting to the age where crafting is possible.  She has her own sewing machine, loves to draw with crayons and markers and she is all over the whole "making a mess" thing.  So, with Thanksgiving right around the corner and an antsy toddler in the house, I decided to give crafting a shot.  After browsing Pinterest for easy Thanksgiving related crafts, we finally settled on a construction paper hand/footprint turkey, an idea that originated here.  That link, of course has it's own instructions, but I thought it would be more fun to see the project come to life with The Roo.  Are you ready?  Here we go:

Gather up all of your supplies, crafting with an almost three year old is already a precarious project so its best to be sure you're READY!  You will need:
-Pencil or pen
-Paper Scissors
-Construction or scrapbook paper in brown, orange, red and yellow (or whatever color you want your turkey to be, we didn't stray too far away from the original)
-Googly eyes, pom poms, buttons, sequins, rhinestones etc for eyes and other decorations-if your toddler can sit still through the entire project...mine was ready to be done before we could Bedazzle the heck outta those tail feathers, but c'est la vie...there's always Christmas!
-Washable glue and a glue stick
-Popsicle sticks, optional-we didn't use them, but had them just in case


I discovered that small children are like magpies-if there's something tiny and shiny (like a sequin or rhinestone, for example) they will jump in (sticky fingers first) with all the gusto of a kitten in a yarn shop and those sequins will go flying faster than The Blue Angels.  I learned this one the hard way, yikes.  Here's how to avoid that:

Put all those pretty, tiny and sparkly things in a container to keep them separate and well, contained

Next, have your child trace her hand, if she's able to, or you can do it for her.  Remy is all about having her hands traced so this was extra fun.  Be sure to trace both left and right on all three colors:


Once you've got her hands traced, it's time to trace a foot.  This was an especially good time for Roo because I allowed her to stand on the table for it!  (GASP!!  The unthinkable, Mom!!  Let's do it!!)


So, now you have all the pieces to make your turkey.  To avoid your little one getting antsy while you're busy cutting out their feet and hands, give them a pencil and some paper and let them trace their hands.  This will take them some time and will allow you to get everything cut out (hopefully)-especially if you have an extra pair of fancy-cutting scissors to let them use.


Once everything is ready, it's time to assemble the turkey!  Turn the foot print upside down, so that the heel is the head.  Have your little one arrange the handprints however they want to make the tail feathers:

When it is arranged to her satisfaction, use your glue stick on the back of the foot and press in place on top of the hands.
Now it's time to give your turkey a face and some legs!  I found it easiest (and cleanest) to have your child point to the spot where they want you to apply the glue for the eyes and mouth.  Don't get too picky about it being perfect, it's their creation and this is how they're using their imagination. 

Cut out a triangle on the fold of a scrap of yellow for the beak

Add a dab of glue for the wattle (a yellow sequin, in our case)


And then finally, give your turkey some legs and feet.  The Roo really wanted to use some green scraps from her hand print cutting and a couple of snowflake sequins for the feet.


We used the hand print that she traced and cut to write her name and the date on and then attached it to the back of the turkey.  Since it was part of the project, we wanted to include it. 
She was so proud of her turkey!  We're going to display it at the Thanksgiving table for all of our guests to see. 
I am sure we will be doing at least one more Thanksgiving craft this week.  We have another idea using everyone's hand prints and some finger paints, I guess I better start thinking mess-free thoughts now!!  I hope you have fun making a Hand/Footprint Turkey with your toddler! 

-Kristi