Tuesday, November 14, 2017

Animal Quilts by Juliet van der Heijden (and a Paper Pieced Rhino)


About four years ago, I taught myself how to foundation paper piece (FPP). It was confusing, frustrating, and challenging. I had only just begun to learn quilting, and I was eager to learn every technique I could. I made Badskirt's Sew Out Loud block for my friend Katy (@imagingermonkey on all the various social media stuffs) with the words "slave to the needle" embroidered on it. If you know Katy, you would totally know how perfect that was for her! Anyway, even though it was an entirely maddening experience, I was completely hooked and began to FPP every chance I got.


One of my favorite FPP designers, Juliet van der Heijden,  has recently written a delightful and charming new book called Animal Quilts. In it are 12 animal FPP patterns, instructions and helpful hints so that even the very beginner can handle stitching up a stunning new quilt. I was thrilled to be asked to join the blog hop for this book, but not so thrilled that I had to choose just one pattern to feature. I wanted to do them all, but time wouldn't allow it. SIGH!


 They are all so unique and gorgeous! The monarch butterfly on the cover immediately jumped out at me, but I thought that it would probably be done a few times, so I flipped through the pages again, trying to decide which one to sew, which one would challenge me, which one would be unique.


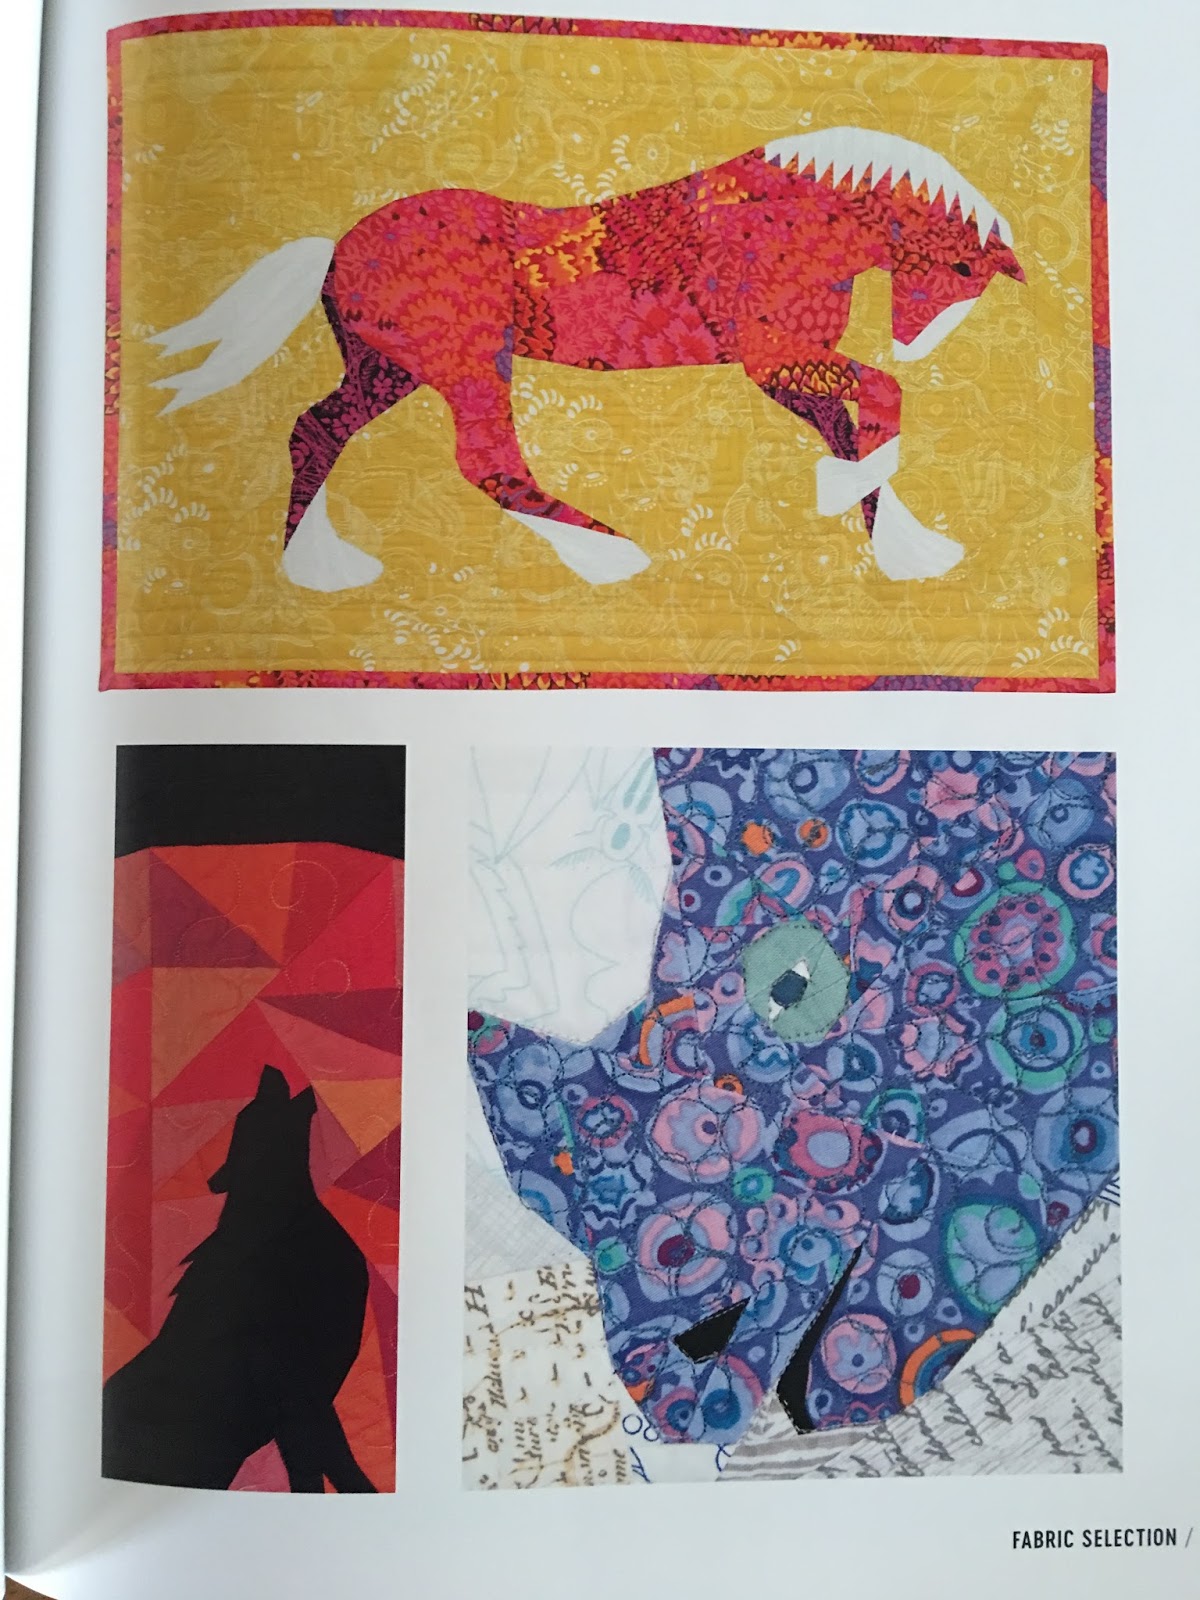
The highland cow was a strong contender, and it's not hard to see why. Isn't he amazing?? I'm going to make this one anyway. In fact, I'll probably sew my way through this whole book (it's that good!) I'm fairly certain that's what Paul has been doing, actually! (See schedule below for Paul's information. You won't want to miss it!)

 I LOVED the highland cow, but eventually decided to do the rhino pattern.


He was everything I dreamed of: challenging, unique, quirky, and charming. I started working on him at Aurifil's demo table at Quilt Festival in Houston. Lots of people stopped by to watch me work, admire the book, learn, ask questions or exclaim over how tiny the seams were in some of the pieces.

{the eye: some seams are only four 1.5 length stitches long!}

{messy business!}
Because I was continuously starting and stopping, I wound up making a several mistakes and had to redo five sections. I think it was worth it, though. I love the way it turned out. 


I am working on a second one right now, it's his eye you see pictured above.


When this pair is finished, I will quilt them with a layer of batting and muslin, then turn them into pillows for my dear friend Elizabeth. It's her birthday today and these are exactly perfect for her. 

I hope you will stop by the blogs and/or Instagram accounts of the other hoppers below. There are some gorgeous pieces being featured (and more photos of the book and quilt patterns!) 

Happy Sewing!
Kristi


Monday 6th November – Juliet from Tartan Kiwi

Tuesday 7th November – Annabel from Little Pincushion Studio

Wednesday 8th November – Chris from Made by Chrissie D

Thursday 9th November – Quilting Daily
Friday 10th November – Matthew from Mister Domestic 


Monday 13th November – Kate from Quilt with Kate 

Tuesday 14th November – Kristi from Schnitzel and Boo (That's me!)

Wednesday 15th November – Angie from Gnome Angel 
Thursday 16th November – Paul aka Evildemondevildog
Friday 17th November – Sarah from Sariditty

Wednesday, August 30, 2017

Tutorial: How to Join the Ends of Quilt Binding


Me again! Two days in a row, weird! I'm back, as promised, to show you how I join the ends of the quilt binding when finishing my quilts. It has taken me a LOOOOOOONG time to figure out a good method for this, and an even longer time to remember how. Now that I've got it down, I'm comfortable with sharing it with all of you

 I almost always cut 2 1/2"xWOF strips of fabric to make my binding. *WOF= Width of Fold, which is generally 42 usable inches. To figure out how many strips to cut, add up all four sides of your quilt and divide that number by 42. For example, my quilt was 82"x90". 82+82+90+90=344. 344 divided by 42= 8.2. Always round up, so in this case, I cut 9 strips of 2 1/2"x42". Join them all together, then roll it up to make it tidier for stitching. 


Until I can write my own tutorial, click here for a good how-to on making quilt binding, 
and here for how to attach it.

You will need:
-Fabric scissors
-Ruler with a 45* angle
-Fabric marker
-Pins


 Once you've got your binding mostly stitched on, you are ready to join the ends. Make sure to give yourself plenty of space between the loose ends to work! 20" is ideal, but make the most of what you can with the size of your quilt.  

Now is a good time to trim the other binding end to a 45* angle if you haven't already done so. Align the 45* line with the bottom edge of your opened up binding; use the fabric marker to draw the line. Notice that this is the tail on the left.


Open up the binding tail on the right, aligning the bottom raw edge with the edge of the quilt. Make sure there are no gaps or wrinkles in the binding and that it is perfectly smooth and matched up with the quilt! Pin it in place so it doesn't shift while you're working on the rest. 


Place the tail on the left on top of the pinned tail on the right.


Use the ruler as a guide to draw the cut angle of the tail onto the binding below it.


Remove the top tail, measure 1/2" to the LEFT of the original line; cut on this new line. This accommodates the 1/4" seam allowance for both sides.


Place the tails right sides together; pin in place and stitch. 
Because the ends are at an angle, you will have little triangles sticking out of both sides by 1/4". This part always confused me, so I took a picture at a distance and close up so you can see how this is supposed to look. 


Now all you have to do is finger press that seam open, refold the binding on its original crease and finish stitching it to the quilt. Well done, you! 


I'll do my best to remember to take photos of the making and attaching steps the next time I'm working on a quilt. I hope you've found this tutorial to be simple and straight-forward. 

Happy sewing!
-Kristi

PS For details on the above quilt, click here.


Tuesday, August 29, 2017

SO MANY TRIANGLES! (and hexagons, too!)

Hey! Wow, does this thing still even work?? 

I guess we'll find out, right?

So, hi there! It's been QUITE AWHILE. You could say I've been a little busy. Oh just a tad...I was hired as the Technical Creative Specialist at Aurifil, which means lots of travel, Roo has taken up ice skating and horseback riding, I started a guild, adopted a new puppy, painted my sewing room, became a Brand Ambassador for Shannon Fabrics etc. Busy and overwhelmed has been the new me, but now that I have that all under control and in the daily routine...


I would like to show you my most recent finish: a triangle and hexagon quilt featuring the Reverie Fusion fabric collection by Art Gallery Fabrics. My friend Mathew, aka "Mister Domestic" is the zany, crazy, awesome personality behind their brand and he's come up with a brilliant way to showcase their various collections by hosting Mister Domestic's Sewing Party. He asked if I would like to participate in the upcoming round, and of course I said yes. I sat down with my graph paper and newly purchased (and now lost) mechanical pencil and sketched out a design. A little quilt math, some coloring between the lines, a quick peek at the collections online, and I was on my way.

It took about three solid days of cutting and sewing the triangles,
and a day and a half for the hexagons themselves.
Of course, I had to use the unstitcher stick on the first pair of triangles I put together,
 that's just the way it goes!


Before long, I was doing two rows per hour.


Somehow there were a few extra triangles, but it didn't matter because I still had to trim the quilt.


Knowing what my plan for the hexagons was, it seemed a shame to cover up such perfect points:


Then again, I also had a few not so perfect points in there as well!


I figured that since my top was already perfectly in place on my quilt batting design wall, I would just use that for the quilt and replace the one for the wall. It was about that time anyway, the bunnies had nibbled the bottom of it and it was looking kinda ratty. This was actually a really good decision because it made making the quilt sandwich a lot less tedious. I only had to spray baste the backing to the batting/top-and no pin basting! Yay!

Thank you to English Paper Pieces for the handy little 1 1/4" papers and the acrylic template!


Luckily, I had the perfect shade Aurifil 50wt thread in yellow (#2130) to do the quilting. 
It was the perfect bright golden shade for this collection of fabrics. 


Taffy (the puppy I mentioned earlier) kept me company while I worked.
She's such a sweet little doggy!


Peek-A-Boo!


I am really happy with the way this quilt turned out. It still amazes me when I can pull something out of my head and make it turn out exactly as I imagined. 


Come back tomorrow for a quick little tutorial on how I join the ends of my quilt binding!

Happy Sewing!
Kristi

PS Please follow along with the rest of the party as we each bring you something to inspire you each day during the party. Our schedule is below, I think you'll love seeing us through our creations. You can check it out on Instagram and our websites:

August 28th - Justin Stafford (le vintage chic) @keatonquilts www.keatonquilts.com

August 29th - Kristi McDonough (reverie) @schnitzelandboo www.schnitzelandboo.com
August 30th - Paola Baker (bachelorette) @loveoffabrics 
August 31st - Alisa Kutsel (spices) @astitchinbetween www.astitchinbetween.com
September 1st - Elise Baek (le vintage chic) @eliseandemelie www.eliseandemelie.com
September 2nd - Mathew Boudreaux (woodlands) @misterdomestic www.misterdomestic.net

Thank you for being such an inspiring host, Mathew! I had a great time! XOXO

Wednesday, February 15, 2017

Geogram by Samarra Khaja


Twice a year, Quilt Market rolls around, and every time it does, I tell myself that I WILL NOT say yes if someone asks me to sew for their booth.  And then every Market, I end up sewing.  It's so exhausting and can be very stressful due to the time restrictions.  Houston 2016 was going to be different!  I was NOT NOT NOT going to do it, I don't care who asks!
Yeah, right.
And then Samarra Khaja said, "Hey, Kristi?  Your name came up as someone who might be able to help me.  I have a men's vest I'd like to have made for my booth..." Then guess what?  I found myself enthusiastically agreeing to that men's vest.  And a shirt, pair of pants, bow tie, neck scarf, skirt, jacket and baby romper.  Oh!  And two pretty cool band jackets for Samarra to wear during Market. 

I was happily up to my eyeballs in redesigning existing sewing patterns, matching hand-dyed threads to funky awesome quilt tops (Panda pictured above), taking FaceTime calls with Samarra while at work and sending mass amounts of text messages over fringe and trim. 

I didn't mind one bit, though.  And do you know why?  Because Samarra is infectious and warm and fun.  You could say that her new line with Lecien, Geogram, is too.  It's bright, colorful, versatile, subtle and very clever.  There are 30 bolts in this one line.  THIRTY BOLTS!  That is so incredible!

I spent a few frantic weeks helping her put together a good chunk of the items for her booth, with the help of my mom, who is a long arm quilter. Samarra stitched all of the animal portrait quilt tops herself, which are the coolest animal quilts I've ever seen, and then sent them on to my mom to be quilted, "framed" and labeled.

Fortunately, we didn't need to ship all of her items because Mom and I had decided to drive the ten hours (it'll be fun!  What?? No.  Never again.  Yeah, yeah, famous last words but in this case I mean it!) from Atlanta to Houston and deliver everything ourselves.  I'm telling you, that was the longest drive ever.  EVER.  EVERRRRRRRRRRR ugh, never again.
Anyway, somehow we made it in one piece and we delivered everything the next day.  We spent a few hours helping to arrange and set up Samarra's booth while she ran around between booth and two schoolhouses.    The next day, it was official booth time.  The response was incredible, mostly because of her animal quilt portraits and those amazing 3D masks.  But still, it felt really good to be a part of something so unique, creative and visionary.

Here are a few pictures of what I worked on, in progress and completed.  Be sure to ask your LQS to stock her new line, it is definitely stash-worthy!  Heck, it's even horde-worthy!  Enjoy!
  
Baby Romper front and detail 

Men's vest pattern in redesign mode 

 
Men's vest detail and almost finished

Girl's jacket lining in progress 

 
Girl's jacket finished 

Band jacket #1 detail 

 Epaulettes!


Samarra's jackets almost finished

Jacket detail

Girls skirt finished

 
Neck scarf and bowtie


Take a look at the Geogram Blog Hop, if you can!  There's some cool people showing off their projects!  You never know what's going to inspire you, right?

Enjoy!
-Kristi-


• Feb 1, Wed: Brenda Ratliff | @justabitfrayed | http://www.justabitfrayed.com/
• Feb 3, Fri: Katy Jones | @imagingermonkey | www.instagram.com/imagingermonkey
• Feb 6, Mon: Tara Curtis | @weftyneedle @t_jaye | http://www.tjaye.com/blog
• Feb 8, Wed: Nicholas Ball | @quiltsfromtheattic | https://quiltsfromtheattic.wordpress.com
• Feb 10, Fri: Jessee Maloney | @jessee_artschooldropout | www.artschooldropout.net
• Feb 13, Mon: Nicole Daksiewicz | @modernhandcraft​ | http://modernhandcraft.com
• Feb 15, Wed: Kristi McDonough | @schnitzelandboo | http://www.schnitzelandboo.com
• Feb 17, Fri: Laura McDowell Hopper | @sonicstitches | http://www.sonicstitchesquilts.com/
• Feb 20, Mon: Giuseppe Ribaudo | @giucy_giuce | https://www.instagram.com/giucy_giuce/
• Feb 22, Wed: Daphne Parthoens | @octopurse | https://www.instagram.com/octopurse/
• Feb 24, Fri: Kate Basti | @katebasti | https://www.instagram.com/katebasti/
• Feb 27, Mon: Rebecca Greco | @hugsarefun​ | http://hugsarefun.com
• March 1, Wed: Terry Druga | @tooheycohen | https://www.instagram.com/tooheycohen/
 • March 3, Fri: Samarra Khaja | @samarrakhaja​ | http://samarrakhaja.tumblr.com