Showing posts with label Dessert. Show all posts

Friday, January 04, 2013

Day Three Good Deed and some Cookies


Remember yesterday-how I told you about the kitchen sink?  Well, the plumbers did come today-and I offered that glass of water (Good Deed!)...but not to the first round of plumbers that showed up.  Curious?  Ok, here's how it went...

A couple of nights ago, we ran the disposal, which worked just fine until we shut it off.  At that point, it regurgitated everything back up the drain in both sinks, pretty gross.  So, my husband did his best to figure it out but eventually had to admit defeat and call our property managers.  When they finally called us back this morning, it was after 11:00 am and I had a box of irreplaceable things packed in case our house burned down.  See, when I walked in the door after dropping Hubby off at work, all I could smell was hot, melted plastic coming from the kitchen.  I was a little freaked out.  I discovered that the source of the smell was coming from the cupboard under the sink, so I immediately unplugged the garbage disposal and made a call to my husband who called the property managers yet again.  Our response (the 11am one) came two hours later with the promise of someone coming to our rescue on Monday-IN THREE DAYS.  That would be three days without using our sink or dishwasher with the smell of melted plastic hovering about the sink.  I was slightly panicking, which is why I packed the box.  Anyway, the manager called me directly and I was able to explain the situation.  She responded with " Well, I'll see if I can call someone to come help, but I don't think it'll happen until late this afternoon." Great.  How comforting.  My house is melting around me and you don't care.  Fine, I can handle this.  When the plumbers called me, they also told me that they could come out on Monday.  Did no one understand?  What was going on here?  Where was the communication?  Once again I had to explain the potential melting pipe situation and finally...FINALLY someone understood!  Forty-five minutes later, there were two plumbers standing on my doorstep.  Two butt-crack angels of hope with the capability to save my home from certain doom.  I was so relieved.

Once again, I explained the goings-on and then went back to the business of my Scrappy Trip Along quilt.  Five minutes later, Butt Crack 1 and Butt Crack 2 informed me that my disposal was fine, the melting smell was being caused by a continuously running disposal motor (keep in mind that this thing was unplugged and that it had been turned off already for at least 36 hours.) and that the problem is that the pipe outside was clogged.  Oh, and they couldn't smell anything...probably because I had just baked cookies and that was the prominent smell in the house.

I thanked the Butt Crack Twins and sent a text to my husband with this puzzling development in the Sink Saga.  We weren't very pleased at all.  

Twenty-five minutes later there was another knock on the door.  It seemed the Butt Crack Duo had an additional member to their party.  He was late to the party and, surprisingly, without information from either the plumbing company or the property management.  I found myself yet again explaining the situation.  I expected him to say "Oh, ok, one of our guys was already here and they couldn't fix it?  I guess that's it then, see you!"  But instead, he asked if he could come in and take a look at it.  Ten minutes later, the sink was fixed.  FIXED.  I was so grateful that I skipped right past that offer of a glass of water and gave him a bagful of cookies.  He tried to refuse but I gleefully insisted and I think he was secretly happy to take them.  (I imagine that he scarfed them down before he even got out of my driveway.)

I have since ran the dishwasher and noticed that the melty smell is completely gone.  I am so thankful that there was a miscommunication going on.  I wouldn't have a working disposal and peace of mind otherwise.  I loved that I had something to show my gratitude to the guy who came in despite the fact that his co-workers couldn't fix it.  I loved even more that he took the cookies, he had a big smile on his face and that small gesture of thanks opened him up to a small conversation about our weekend plans: he has to work, I'm going to sew.  Those cookies bridged the gap of being a customer and serviceman to two real humans.  I wasn't just a clogged sink and he wasn't just a butt crack in my cupboard.  Isn't it funny how something so very simple can bring us back to humanity?  I think all the world's problems could potentially be solved with cookies.  The banana is wrong, cookies are the world's most perfect food.


So, how about a recipe?  My friend Tammy passed this one on to me a few Christmases ago.  It's pretty easy and is pretty unbelievably delicious.  I'd be willing to bet that you have all the ingredients on hand already.

Tammy's Flourless Peanut Butter Chocolate Chip Cookies

preheat oven to 350*

Ingredients:
1 cup peanut butter
1 cup brown sugar
1 egg
1 teaspoon baking soda
1 teaspoon vanilla
1 cup chocolate chips

Mix peanut butter, sugar, egg, vanilla and baking soda until creamy and well-blended; stir in chocolate chips.  Drop by rounded tablespoonfuls on a cooking spray coated baking sheet.  Bake for 10-12 minutes; allow to cool on cookie sheet for 1-2 minutes before transferring to a rack to cool.

Happy Baking!
-Kristi-

PS Tomorrow's good deed will be: Tuck Your Sweetheart In.  Get ready!

Friday, December 21, 2012

Recipe: Nutella Peanut Butter Marshmallows

It's been awhile, right?  So, here I am back from the abyss with a reward for you, dear readers.  For your persistence and consistent interest in my sadly neglected blog, how about a recipe?  Yes?  How about a recipe for something you can make in an hour that will totally blow your socks off?  Well alright then, here you go!


Nutella Peanut Butter Marshmallows

Ingredients:

Part 1
1/4 cup corn syrup
3/4 cup sugar
1/8 teaspoon salt
1/2 cup cold water
2 packets plus 1/2 teaspoon unflavored gelatin

*****

 Part 2
1/4 cup corn syrup
2 teaspoons pure vanilla extract
3 heaping tablespoons peanut butter
{3 heaping tablespoons Nutella}

*****

Part 3
1 1/2 cups powdered sugar
1 cup cornstarch

Directions:

1. Lightly coat a 9"x13" glass baking pan with cooking spray; wipe evenly with a paper towel and set aside.

2. In a small bowl, dissolve gelatin in cold water; set aside and let soften for 10 minutes.


3. In a small saucepan, add corn syrup, sugar and salt and heat over medium-high to 240* on a candy thermometer.  

This does not take very long once the mixture is boiling.  Keep a close, constant eye on the temperature or you'll wind up doing what I did:
This is what happens to the syrup when cooked past 240*, yikes!
 4. When the gelatin has softened, place it in the microwave on high for 30 seconds.  Pour 1/4 cup corn syrup into bowl of an electric mixer, then add gelatin.  Keep your machine running while the syrup mixture reaches temperature on the stove.


5. Once your syrup has reached the soft ball stage of 240*, slowly add it to the mixing bowl, while it is still running; turn mixer on medium and beat for 5 minutes; turn mixer to medium-high and beat for an additional 5 minutes; turn mixer to it's highest setting and beat for 1-2 minutes; add vanilla and mix thoroughly.


6. Place peanut butter in a medium sized bowl; add 1/4 of the marshmallow creme and fold until thoroughly mixed.


Looks good, right?  Wait til you taste it!


7. Gently fold remaining marshmallow cream into peanut butter mixture until combined.  Spread into the bottom of prepared pan and set aside while making the Nutella layer.


Repeat the above process for the Nutella layer, substituting the "{3 heaping tablespoons}" of Nutella for the peanut butter.  Spread on top of the peanut butter layer.

Combine corn starch and powdered sugar in a sifter and sift generously over the top of the marshmallows.  Allow to set for at least six hours before cutting. Roll cut marshmallows in powdered sugar mixture and serve!

(Peanut Butter and Jelly Marshmallows made with Bakerella's recipe)


Thanks very much for coming back!  I hope to give you a reason every day to come and visit.  Take a moment to say hi, if you like!  

Happy cooking!
-Kristi


Sunday, July 01, 2012

Perfect Chocolate Chip Cookies


Over the years I have perfected the method for making the best chocolate chip cookies.  I know, I know...that's quite a bold statement.  But just listen: these never come out flat, they never spread out and they don't get crunchy.  They're perfectly golden brown, fluffy and chewy in the center and ever-so-slightly crisp on the edges.  Absolute perfection!  (And pretty darn tasty dough! Although, please don't tell my sister because she hates when I eat raw cookie dough.) 


Ingredients:
2 1/4 cup All-Purpose Flour
2 teaspoons baking powder
2 sticks salted butter, softened
3/4 cup dark brown sugar
3/4 cup white sugar
1 1/2 teaspoons vanilla
2 eggs
12 ounces mini-chocolate chips

What To Do:
Preheat oven to 350*F.
Combine flour and baking soda in a medium sized bowl and set aside.

In the bowl of your mixer, add brown sugar, white sugar, vanilla and butter.


Blend on low speed just until butter is broken up:

It looks weird and goes against every other recipe's instructions, but just trust me.
Add both eggs:


Combine until this is barely blended.  It'll be slimy and chunky and really gross looking, but I swear it'll be fine.

Looks a bit oogie, right?
Now add the flour mixture about a half a cup at a time:


Until it's all blended nice and smooth:
 
 
See?  No butter chunks, perfectly blended, nice and firm!

Now, add your chocolate chips:


Mix until well combined.  I usually put my chocolate chips in the freezer for a few hours before mixing them in the dough.  Otherwise, they break up and clump in the dough and that's no good!

Don't you wish you could stick your spoon in and get a bite?
Place rounded teaspoonfulls on a cookie sheet about 2" apart and bake for 10 minutes. Transfer immediately to a rack to cool.


Now, go!  Bake cookies for the masses!  Your friends will want the recipe so be sure to send them this way, okay?  Happy baking!

-Kristi-

Wednesday, February 08, 2012

Tutorial: DIY Dessert Stand


Of two things about this party I was sure: one, I was going to make homemade gumdrops and two I wanted an awesome way to serve/display them. I mean, if I was going to go to all that trouble to make them, I might as well put them into something worthy of my time!

I've been seeing cake plates and dessert stands pop up all over Pinterest and figured that I could probably figure out a way to make one myself.  So, with an idea in my head and my husband in tow, we set off for Target where we bought a melamine plate and matching bowl (about $5 for both).  After that, we went to Home Depot to find a way to connect them.  First we looked at wooden dowels but couldn't figure out a satisfactory way to get the bowl to sit up high on it.  We decided on an 1/4" x 12" threaded rod ($1.59 in the plumbing section) and a packet of nuts.  A trip to the craft store yielded a spool of ribbon (on sale for $1!) and four wooden drawer pulls ($0.70). 

(we ended up not using the metal things on the left)


When we got home, my husband got right to work on the project.  First he peeled off the price stickers and placed them in the center of the dishes.


  Next, he measured and marked the centers for both.


Using a 1/4" drill bit, he slowly and carefully drilled a hole through the plate and bowl.  He left the stickers on for this process to help prevent chipping the dishes.


Once the holes were drilled, we could assemble the stand.  But first, we had to glue the wooden drawer pulls to the bottom of the plate so we would know how much room to leave for the threaded rod at the bottom.


Next, he twisted one of the nuts on to the rod and set the plate down onto it.


Next, we decided how far down the rod to place the bowl.


Once we were satisfied with the placement of the plate and bowl, he dabbed a bit of hot glue to the base of the plate and bowl to make sure it would sit nice and sturdy.


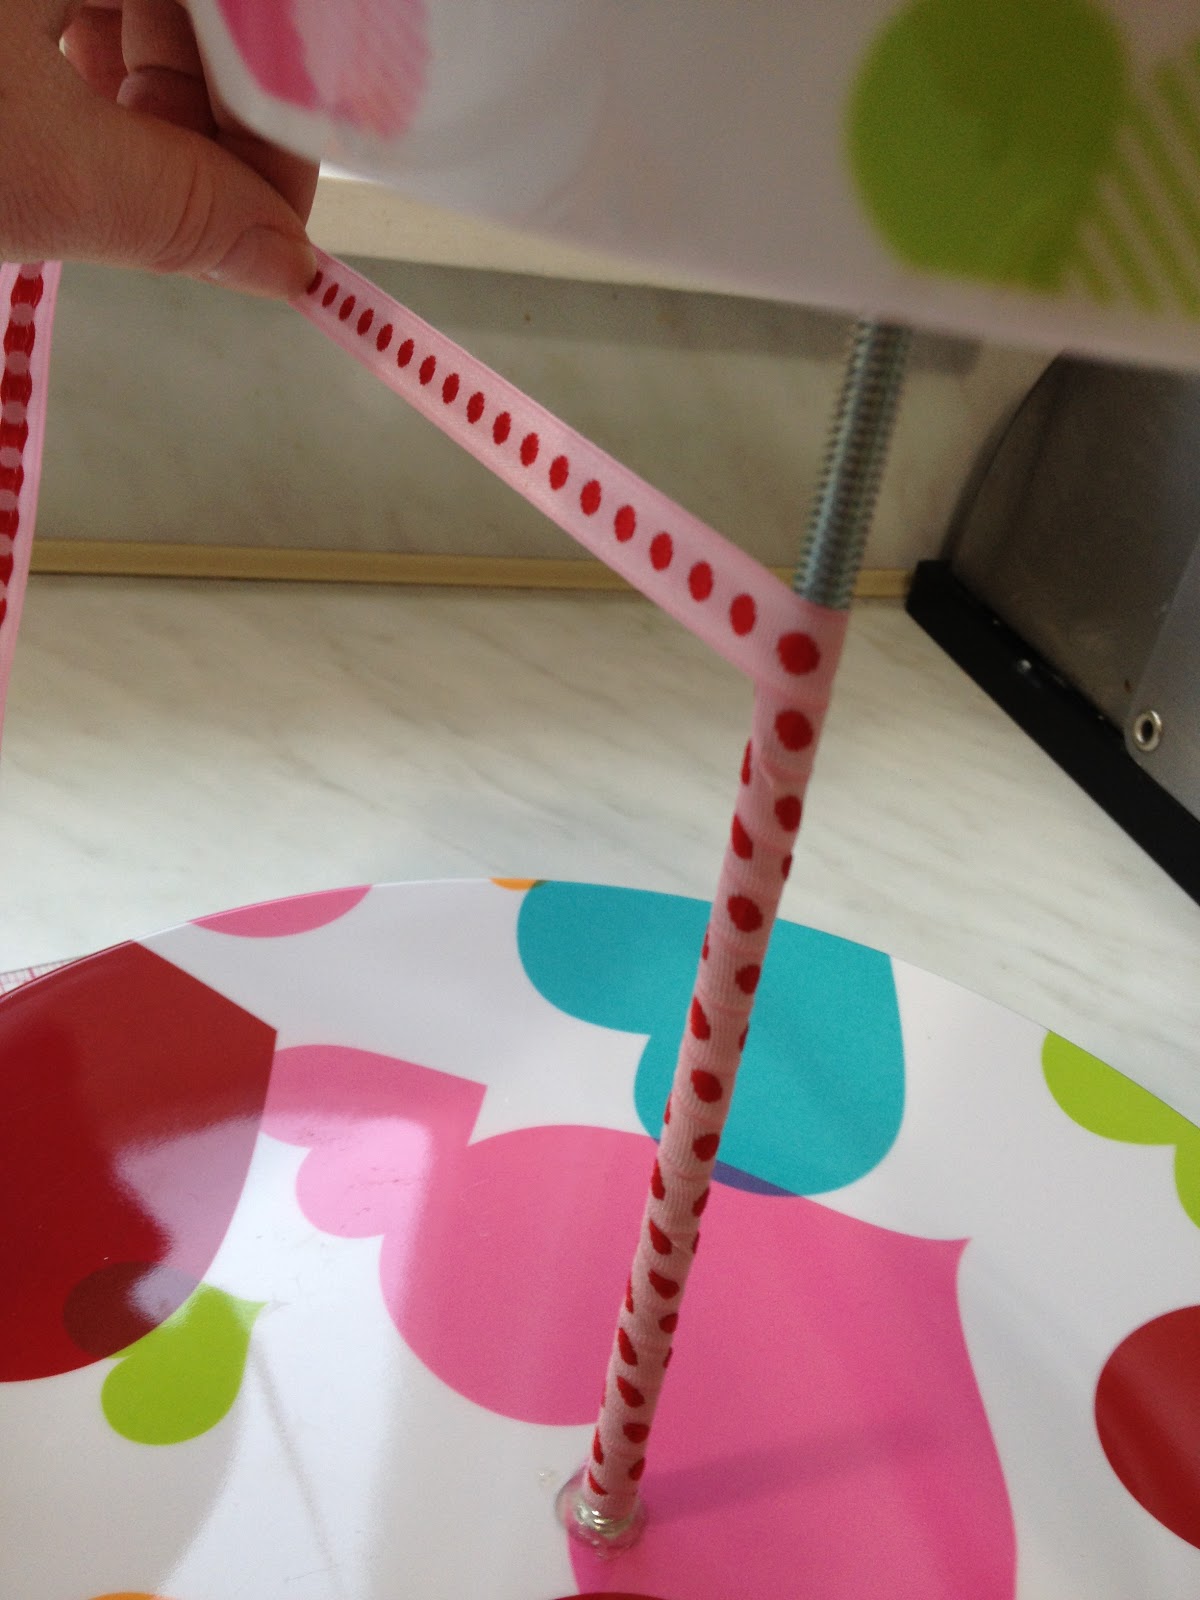
Then it was time to make the final touches.  I used a piece of ribbon that I found in my stash to cover the rod.  I applied about 2" of hot glue to the rod and wrapped the ribbon around it.  Be sure to glue in small increments because it dries fast!


Looks good so far, right?


Oh, hello Ollie!  We're almost done, then we can go for a walk!

For the very last touch, I put a dab of hot glue into the opening of a drawer pull and then threaded it on to the top of the rod.  I decided to cover the knob in a piece of ribbon (instead of painting it) and top it off with a bow for extra cuteness.


I think it turned out really well, don't you?  This was a very inexpensive and fun project to do.  It only took us about an hour from start to finish and cost us around $10 to complete.  It would be a fun decoration for any party or wedding and would be especially cool to make and give with your annual Christmas cookies. 

This dessert stand is ready to boogie!

Please feel free to leave me a comment, let me know if you have any questions!

-Kristi