I made a deal with my friend before I went to Kansas City for Quilt Market. If she could watch The Roo before and after school for a few days while I was gone, I'd trade her for a sewing project or two. She didn't even hesitate. In fact, I'm pretty sure she said "Can you make me a few reusable snack bags?" before she even agreed to watch her.
At first she asked if they could be made out of vinyl or plastic so that they could be wiped out, but after discussing food safe vs. chemical laden plastic etc, we both decided that just plain ol' fabric 'n velcro bags would be the best. Then I decided (on my own) that I was going to make the bags out of a flour sack towel because well, shoot-they had to be food safe that way, right?
At first I was going to make these bags lined, but then decided against it for a couple of reasons. I figured that an unlined bag would be easier to keep cleaner longer (no crumbs and food dust to get caught between the lining and outside layers, gross!) and also, I didn't want the bag to be too bulky. (It needed to stay lightweight and compact enough for your child's lunch bag or your pocket.)
Before I set to work, I thought of just one more thing...French seams. I definitely didn't want loose threads or trapped lint to get all wrapped up in her grapes so I knew I had to finish the raw edges but skip the serger. As soon as all of the details were worked out, I sat down to complete my first snack bag and about twenty minutes later I was done!
So are you ready to make your own?
 |
| Finished Snack Bag size: 9 3/4" x 6" |
What you will need:
-Flour Sack towels (I found mine in a four-pack at Target for about $5)
-Scrap fabric about 3"x13"
-Thread
-Velcro
-Pen and Grid Ruler
What you will do:
Fold towel in half, then in half again (creating four equal squares) and press.
You can see that the towel was probably not totally square to begin with as you may have wonky edges. This is okay, use your grid ruler to draw a straight line on both UNFOLDED edges; trim carefully on the straight line. You may want to pin the layers together to prevent sliding. (I decided to skip that step.)
You will have four separate towel squares, but you will only need one.
Fold the square in half and press. This will create a center guideline for your scrap fabric strip.
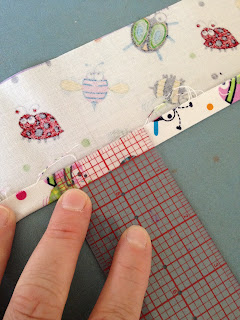
To finish the fabric strip, fold the long raw edges of the strip to the inside 1/2" and press.
Pin the strip carefully to the center of the square, using your center fold line as a guide.
Carefully edge-stitch the strip in place, 1/16" on all four sides.
Now, this is where it's going to "feel" strange. With WRONG sides together, fold square in half, pin both short sides together and stitch, using a 1/2" seam allowance.
Very carefully trim the bottom corners off the bag.
Turn bag wrong side out and press.
Stitch the sides again, this time using a 3/4" seam allowance.
Without turning the bag right side out yet, press seams towards the sides.
Now, turn the top edge under 1/2", all the way around, and press. (Again, the bag has not yet been turned right side out.)
Cut a piece of velcro the length of the bag opening minus 1/4". For example, if the bag is 10" long across the top, cut your velcro 9 3/4". Pin or glue the soft side velcro in place, then carefully edgestitch along all four sides.
Repeat the last step for the hard side velcro on the other side of the bag.
Turn bag right side out, poke out the corners and voila! You're done!
If I wasn't giving this one away, I would have filled it up with snacks to show you how awesome and useful it is. No more landfill plastic baggies, no more wasting your money on a throw-away item. Doesn't that feel good?
Happy sewing!
-Kristi-


I think you should sell these on Etsy also!
ReplyDeleteI love the flour sack idea! I had no clue what a French seam was, and they look really useful & sturdy. Great tutorial!
ReplyDelete