Friday, May 16, 2014

Pattern Review: the Zsalya Top

the Zsalya top (left) and dress (right) by Kate N Rose on Etsy


This pattern testing thing...I LOVE IT.  I recently made the Zsalya Top by Kate and Rose Patterns.  When we had originally been asked to test, I had all kinds of time at my disposal.  But, you know how life goes, there were some understandable and unavoidable set-backs so we didn't get the pattern until a couple weeks later.  By that time, of course (it's just the way it goes) I was up to my ears in other deadlines and projects.  But, I went out and bought some fabric anyway.  I wanted to make sure I had everything I needed to make the blouse when I had enough time in between projects.  I left my little stack on my sewing table where I could see it every day, where it would just sit there and say, "Hello!  I'm here!  Make me into something fabulous!" I admit, it sat there a few weeks taunting me until one evening I sat down to work on it and realized that I didn't have any black thread.  Oh sure, there was two spools of yellow, one grey, two pinks, one aqua and four different shades of white but no black.  So, back to the Other To-Do List I went, and my little top-to-be continued to sit and wait.

Simple Luxuries- Mesh Dot Black Nylon Spandex on JoAnn.com

Slowly but surely, my list began to shorten, I remembered the spool of black thread the next time I was at the store and that evening, I found myself with a free evening and an empty sewing machine.  

(I won't mention that I ran out of scotch tape while putting the PDF together, and I won't tell you how the roll of packing tape sort of came to my rescue.  I say "sort of" because have you ever ripped a piece of packing tape from the roll in a mostly empty apartment with a sleeping 5 year old?  The sound really ricochets off the hardwood floors and empty walls.) 

Seriously, though, at this point nothing was going to stop me from sewing that top!  It was easy as pie to put together-possibly even easier, I mean have you ever made a pie??  I'd rather sew a blouse any day.  Anyway, one of the things I loved the most about working with this pattern was how easy the instructions were to read.  The diagrams were clear (and cute!) and not complicated to look at.  Sometimes a pattern gives you too much information in a diagram and it's hard to know what you're supposed to be doing.  Not the case here.  Plus, the instructions were so personable and friendly, reading through them was almost like having a friend sewing along with me, I loved that!

I didn't have any trouble putting the top together, and I even used a crazy fabric.  I LOVE how the top came out, and I love the way it fits.  What do you think?

I hate having my picture taken like this, ha ha.

Just a little pattern size FYI, I cut out the medium.  I wear a street size 8 in jeans, but a large or extra large in shirts and blouses due to my 36DDD bust size (thank you pregnancy for enhancing what I already had and post pregnancy for not giving up on it... O_o)  I am happy with the way this top fits me and would sew the Medium again from another fabric with stretch.  I have an Anna Maria Horner voile to use next, but in that case I think I will cut the large.

You can buy the Zsalya Top pattern by clicking here.

Happy sewing!
Kristi

Thursday, May 08, 2014

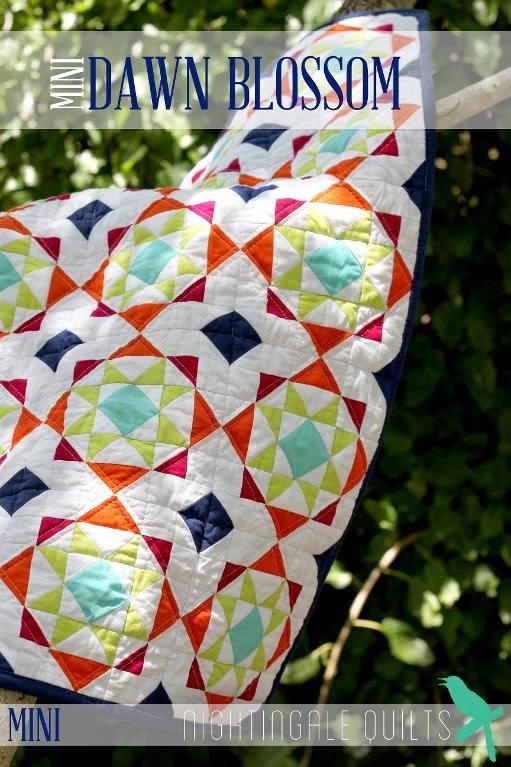
Pattern Review: Dawn Blossom Mini by Nightingale Quilts

Last month I had the lovely honor of being asked to test a new quilt pattern, the Dawn Blossom Mini, by my friend Caroline Greco of Nightingale Quilts.  
Despite my insanely busy schedule, I said yes.  I couldn't help myself!


I LOVE a good star block, and I love even more an unexpected secondary pattern in a quilt design.  This is one of those patterns.  So, one day when I had a little break in the sewing action, I pulled together some fabric and sat down to work.


Now, having just made a huge move from Seattle to Atlanta only a few months before, I didn't have a whole lot of fabric to choose from.  (Sadly, most of my stash is still in our storage unit in Seattle.) I was pretty happy that this pattern only asked for a background plus five other fabrics.  
That was definitely doable.

The Dawn Blossom pattern is made up of sqaures, rectangles, half-square triangles and flying geese.  The instructions were very easy to understand, were clearly illustrated and not at all confusing. (Which is good because I am, technically, still fairly new to quilting.)

Teeny tiny HST!

Super duper, itty-bitty, teeny tiny HST.
Don't worry, that last HST is just a trimming, but isn't it cute??

There was a lot of cutting and sewing, but that's my favorite part.  I love to get lost in the creation process, it's where I do my best thinking.  I forgot to take a picture of the final layout before I stitched it all together, but here is the end result.  

let's all ignore that one little pink HST stuck out there and waving hello.  he's obnoxious...

I have already put the queen sized Dawn Blossom quilt on my Wish List.  I will make it. I love this pattern so much.  Caroline has several beautiful and unique designs to offer.  I really love her modern-traditional hodgepodge style.  Plus, she's pretty dang funny.  

You can find her on Instagram, Craftsy and on Bloglovin.

Wednesday, May 07, 2014

Tutorial: Chalkboard Mini Quilt

It's no secret that I LOVE mini quilts, is it?  My collection is growing, my walls are shrinking and my heart is happier.  When I look around the walls of my sewing room, I see my friends.  I think that's what I love the most about mini quilts.  They're fast, fun and so darn satisfying to make.  I mean hey-you can say you completed an entire quilt in a day!


My second project as a tutorialist for Anna Griffin is for a Chalkboard Mini Quilt.  I think it is super adorable, and I'm pretty sure you will too.  If you're not sure where to buy chalkcloth, check out Laminates and Fabric Shoppe, both on Etsy. 

For this tutorial, I used Modern Eclectic by Khristian Howell.  You can view the entire collection here.


You will need:
*One Fat Quarter of Chalkcloth cut down to 12 3/4"x15 3/4"
*Two squares each of seven different fabrics cut into 2 3/4" squares
(or fourteen 2 3/4" squares)
*One Fat Quarter of an accent fabric cut into two 2 3/4"x22" strips and an applique motif
*One Fat Quarter cut into Four 3 1/2" strips for non-continuous binding
1/2 yard of backing fabric
*scrap of Warm 'N Natural batting measuring approximately 25"x25"
*thread
*rotary cutter/mat/acrylic ruler

**seam allowance is 1/4" unless otherwise noted**


Let's do this:

If you'd like to add an applique to your chalkboard, find a motif in your accent fabric that you like and cut around it, leaving approximately 1/4" all the way around it.  My floral motif was on the corner of my fabric, so I decided to put it in the corner of the chalkboard, and trimmed my edges nice and square to fit.  Decide where you want your applique to be based on the size and location of your motif on the fabric.

Carefully pin the applique to the chalkcloth, you don't want pinholes to be seen on your finished project, so make sure the pins are on the inside edge of the applique.

Edge-stitch around the applique:

I like to go around a few times to give it a more decorative look.

Cut your fabrics into 2 3/4" squares, if you haven't already done so.

Arrange the squares into rows (keep in mind that they will be attached to the sides of the chalkboard).  Stack them into two rows, and stitch. Press your seams to the sides (or use whichever method you prefer.  I like the one described here where you press towards every other square/strip.)

With right sides together, lay one strip on one side of the chalkcloth
 and stitch; repeat for the other side/strip.

Trim off any excess chalkcloth, if there is any.
 
Finger press the seams out.  
(Chalkcloth cannot be ironed)

Doesn't that look nice so far?

With right sides together, stitch the 2 3/4" accent strip to the top edge of the chalkboard; 
repeat for second strip and bottom edge.

Trim excess fabric from top and bottom.


Finger press strips away, and top-stitch all the way around the edge of the chalkcloth.

Yay!  The top of your Chalkboard Mini Quilt is done!  Now let's work on getting it finished. 

Lay the wrong side of the finished quilt top on your scrap of batting, then lay this on the wrong side of the quilt backing, creating a "quilt sandwich".  Using your rotary cutter, cutting mat and acrylic ruler, cut the batting/backing 1/2" larger all the way around; set top aside but do not separate the batting and backing.

Quilt the backing and batting together.
Sometimes I like to draw a design on the fabric with a fabric pen, as seen here.
When the quilting is finished, replace the quilt top, wrong side down, on top of the batting making sure it is squared up with 1/2" batting on every side.

Fenway Frank decided to take a nap on the ironing board.  Hmmm...probably not the best place for a nap, eh, Frankie?

Now for the coolest binding method EVER
Non-continuous binding.  Say what?  Just take a look.  It's life changing.

Ready?  Here we go: 

Begin by ironing the length of the strips, wrong sides together.

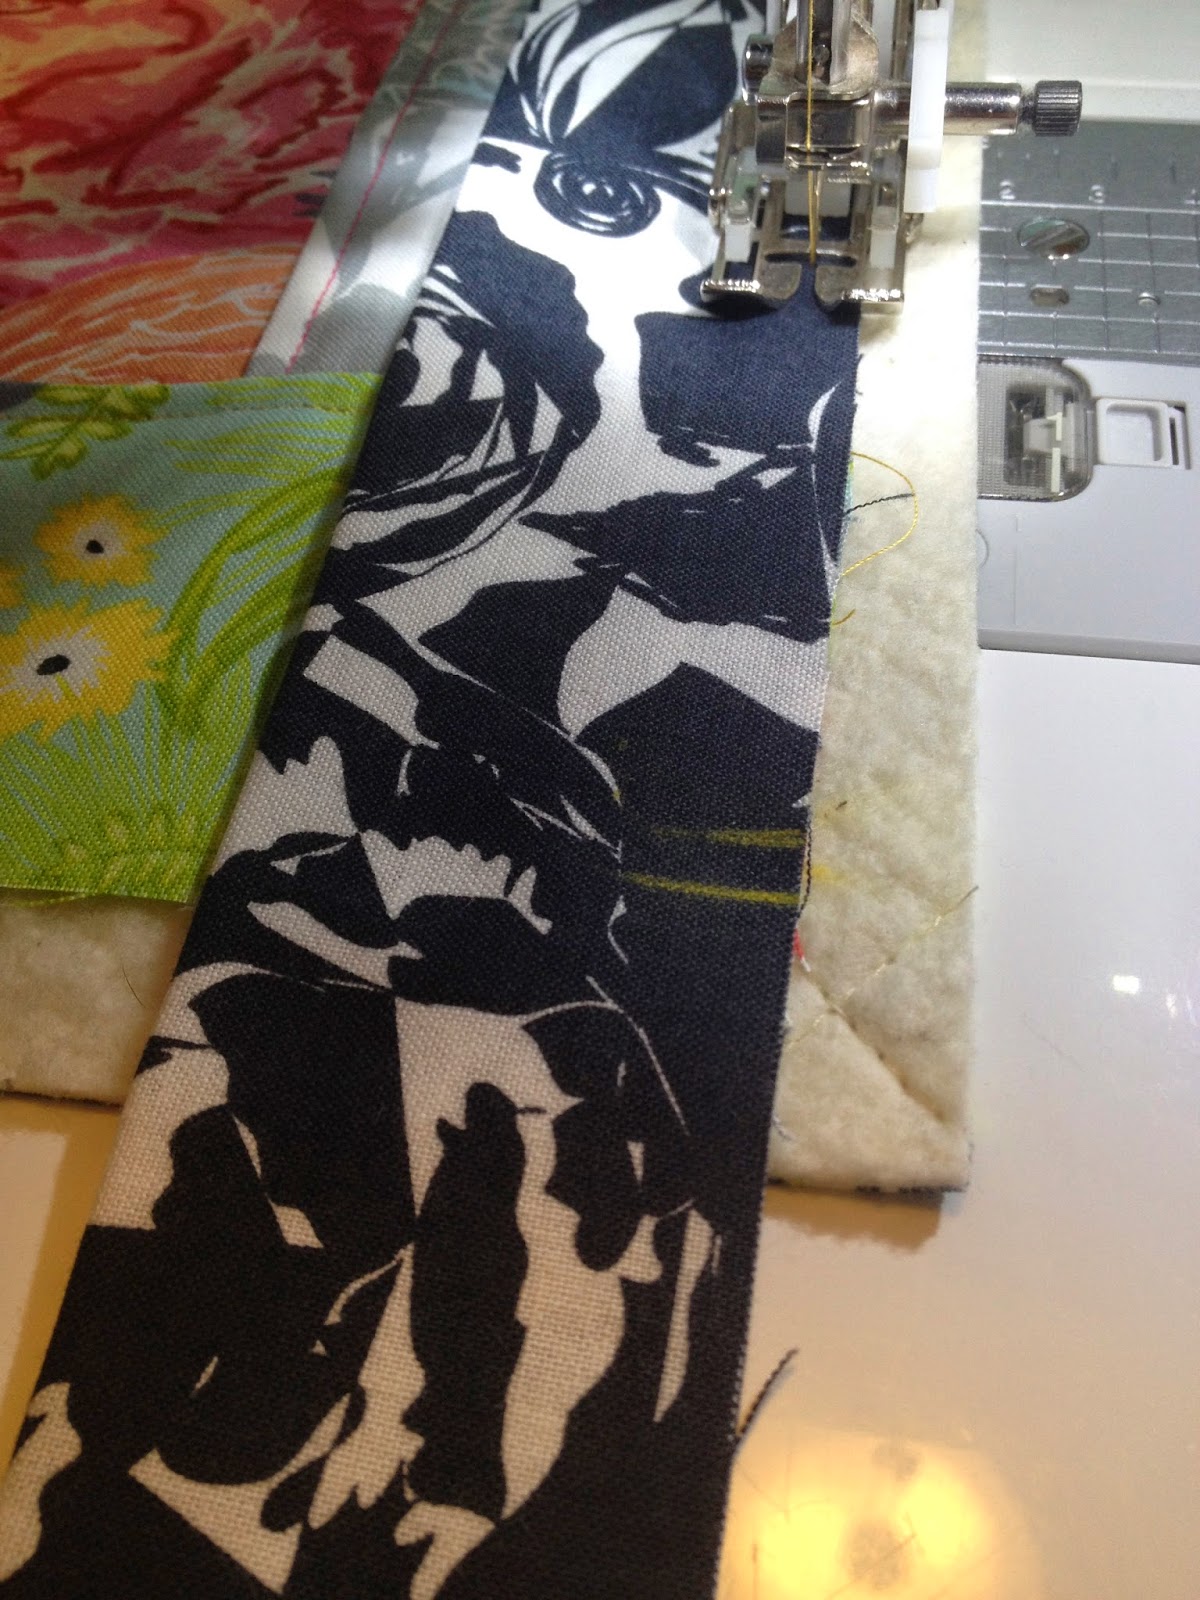
Align raw edges of binding with raw edge of quilt top (you should see the 1/2" of extra batting sticking out) making sure you have an extra couple of inches hanging off the top edge.  Measure inside the quilt top 1/4" from each edge and make a mark on the binding.  
This will be your starting and stopping point.
ignore the first yellow mark, I made a mistake and measured 1/2"

Stitch the binding down, making sure to backstitch at both marks.

Flip the binding off to the side, creating a 45* angle.  Align the second binding strip with the edge of the quilt top, and binding tail; stitch in the same manner as before, making sure to stop and backstitch 1/4" from the edge of the quilt top.  


Again, flip the binding tail away from the quilt and repeat for remaining binding pieces.

Now for those perfect mitered corners.

Place your acrylic ruler on the binding and measure the distance between the fold and the seam line.
Mine was 1 1/2":

Divide that measurement in half (for me it was 3/4") and make a mark.  


From the mark, measure 3/4" straight up (towards the binding tails) and make another mark.  

Connect your second mark to each seam line:

Pin the bindings together on these marks.  Pull the binding away from the quilt and stitch directly on the lines, making sure to back stitch when starting and stopping.


Trim excess binding from stitched lines:

Turn corners out, using a chopstick or metal bodkin to poke corners out, tuck quilt corner in. Repeat for remaining corners.  When you're finished, press binding out, wrap around to the back of the quilt; press again.  Pin binding in place and stitch however you prefer.  I personally love hand stitching, but feel free to get it done whichever way makes you happiest!

You are finished!  Don't you love it?  Now go hang it up somewhere and start a grocery list or a daily happy note to your family.  Did I give you enough time to whip one up for Mother's Day?

Happy quilting!
-Kristi-


Tuesday, May 06, 2014

schnitzel & boo mini quilt swap: ROUND TWO!

Are you guys ready for round two?
my newest Mini Quilt from Lindsey of thatswhatlindseysaid.blogspot.com

 First, let me start by saying that in this round, I will try my VERY BEST to NOT move clear across the country in the middle of the swap.  That was not supposed to happen until June, it seemed all-of-the-sudden because it was all-of-the-sudden.  We're here now, so that's good.  I will be here, right here, for this one!

One of my very favorites, a gift from Cat of cat and vee


Our first round had over 220 participants, isn't that amazing?  I really loved putting it all together and watching both of our little hashtags grow.  Some pretty cool things came out of it.  We made friends, we made quilts, we made memories.  It was pretty awesome.  I'd really like for this next round to be even better than the first one.  Can we do it?  I think so.

the one that started it all, and the poster child for the first round


  Here's some of the important stuff to know:

1. You will be assigned a partner according to the answers you submit, so think carefully!
2. Be sure to give as much information as possible so your swap is a happy success.
3. Quilts can be as small as 6"x6" and as big as 24"x24".
4. This is a secret swap, give us sneak peeks or even full views, but don't tag your partner!
5. Due dates to have your mini quilt in the mail is Monday, July 7, 2014.  This gives you two months to get through quilt market, finish up your WIP's, clear your cutting table off and stock your shelves.
6. Because the ship-by date is so far off, and this is a secret swap, please make every effort to send your swap by July 1 for International Swappers and July 7 for Local Swappers.
7. Come join the Flickr group to share all of your pictures, gather ideas and meet up with new and current friends.
8. Use the hashtag #schnitzelandboominiquiltswap and #makeaquiltmakeafriend to check out what everyone else is doing. These are the exact same hashtags that we used during the first round, let's keep it going!
9. Feel free to send goodies with your Quilts, if you want.  It is nice, but NOT necessary, so don't feel obligated to do so and don't feel bad if you don't. 
10.  HAVE FUN!

another favorite, from Synnove in Norway.

*I like all of you :)
*I won't be mad if you can't fulfill your end of the swap as long as you communicate with me!
*No seriously, tell me if something happens.  Please.
*contact me: schnitzelboo at yahoo dot com or click here

So...you wanna sign up? Click the link:


Now, go spread the word!  Tell all your friends!  Let's make this swap one heck of an awesome success!


Friday, March 28, 2014

Book Review: Sew Fun 20 Projects For The Whole Family


                 I'm not sure what I love more, a new craft/sewing book or making the items that are in it.  I tend to hang on to a new book for days, carrying it around with me, flipping through the pages and creating the items in my head before deciding where I'm going to start.  When I was offered an opportunity to write a review of Deborah Fisher's new book, Sew Fun: 20 Projects For The Whole Family, I jumped at the chance.  


Sew Fun
By Deborah Fisher
Interweave/F+W Media; $26.99
http://bit.ly/17VG9JD


For one thing, I love to sew for my daughter and I love to sew with her even more. This book is a perfect mix of sewing with and for your child.  How could I resist?


Sew Fun has so many thoughtful project in it.  Twenty of them, to be exact!  Twenty projects that showcase your child and their creativity, whether it's taking their drawings and turning it into a pillow like the ones featured in the "There's No Place Like Home Pillows".  I love these!  These are what Roo and I are going to work on during spring break.


Then there's the Topsy Turvy Story Quilt, the ULTIMATE project for featuring your child's artwork and encouraging their creativity and imagination.  I can see how this quilt would be such a great source of pride for any little boy or girl!  And just imagine the hours and hours of quiet play that it encourages! 


Every project in Deborah's new book is so beautifully thought out and meaningful.  She has written a book full of tips for sewing with children and ideas for encouraging their creativity.  She has done a wonderful job of taking the scary out of that first initial step of confidently handing over the scissors and sewing machine and allowing your child to express themselves through an art form that children are naturally drawn to.


I decided to interview Deborah and find out a little bit more about what drives her to create, how she got started and those nonprofit organizations that she is so passionate about.  Enjoy!

*********************************

 1.   I love this book because the projects are so diverse and appealing, I especially love that they can be personalized with my child's art. What inspired you to write a book for children and their families?


Thank you so much! Many of the projects in Sew Fun were objects I was making for and with my kids anyway, or were ideas I had been wanting to try. The Community Quilt project idea began as a gift I made with my daughter’s kindergarten class for their teacher. I was already using my daughter’s drawings to make faces on the Fun Friends From Odds and Ends. A book seemed like a great way to compile all of my ideas and to share them. I am so happy that it all came together. It has been a wonderful experience!


2.   What is your favorite project in this book?

My favorite project is always the Hazel Doll. When I first started sewing I made dolls and I love revisiting the fun that I had with them. There is a special magic in sewing an object that will become someone’s friend. I feel there is a intimacy and sensitivity to sewing a doll that it not as present with other objects.


3.   Who taught you how to sew?

My mother taught me to sew! She always had her sewing machine out and ready for us to use. I was very fortunate to grow up in a house where the handmade was valued.


4. What kind of machine do you sew on every day?

I have a Bernina Aurora 430 that is wonderful. For the programs I do with the Bright Hopes Collaborative Quilt Project, we have basic Pfaffs that get tons of tough use and keep on going.


5.   What tools are in your sewing basket?

A few good basic tools! I still have the set of Fiskars my mother ordered for me from the back of the Cheerios box many, many years ago and I use them everyday, although I have acquired a few other pairs since then. A few good feet for my sewing machine, such as a 1/4” foot and an edge stitch foot. It was happy dance time when I discovered those! Rotary cutting equipment that I actually thought I could do without when I first started making quilts. Silly me.


6.   A lot of parents are afraid to let their child sew (pins, scissors, sharp rotary cutters, the possibility of a sewing machine needle through the tip of a tiny finger). What advice do you have for them on how to let go and let their child experience this world of creativity?


There are so many ways to get kids involved with sewing and reduce the danger level to your comfort zone. And there is a whole section in Sew Fun with tips! Start very young kids off by just stepping on the sewing machine pedal while you sew. Move them onto helping you sew with their hands on top of yours and then your hands on top of theirs. Even rotary cutting can be very safe for kids a bit older if you have them use a cut resistant glove and are standing near them. I think the most important thing is to know the kid and know yourself. Choose activities that will work well with your combined personalities. And remember, if you are nervous, they will be also. Make sure the fun outweighs the safety lessons!

7.   In the back of the book, your Nonprofit Organizations, Bright Hopes Collaborate Quilt Project and Bo Twal, are mentioned. Do you have any advice for a fellow sewist who would like to get involved in either organization?

Thank you for asking!

We are SO excited about Bo Twal! Bo Twal means cloth kiss in Haitian Creole. You can purchase our first sewing pattern, the Sewing Smiles Doll, on our Etsy site, www.etsy.com/shop/botwal. For every pattern purchased, a similar doll is constructed in Haiti and donated to a child there. A new pattern for you, income for a sewist in Haiti, a doll for a child in need. Smiles all around! You can find out more about Bo Twal from our website, www.botwal.org. Updates about new patterns and other news are posted on our Facebook page, botwaldolls, so be sure to like us there.

The Bright Hopes Collaborative Quilt Project is a very local organization. Anyone living on Long Island, especially Western Suffolk, is welcome to join us! Otherwise, we accept monetary donations through our website, www.brighthopes.org, or new modern quilting fabric.


8.   What is your most favorite thing you've ever made?


My 2 girls! But besides them, the answer to this is always changing. I need distance from what I make to really see the objects for what they are. Sometimes my favorite is a collection, like the projects in Sew Fun. Sometimes it is a doll I made when I was 12, or a sculpture I did in graduate school. Right this very minute my favorite is the Bo Twal Sewing Smiles Doll pattern because it is making other people happy-from the women in Haiti who are sewing the dolls to give to children there, to those who are buying patterns here, to those who received dolls as a perk for being part of our Indiegogo campaign. We are hearing wonderful stories and that is always my favorite part of making.


9.   And last, the question I ask everyone-including Keith Urban a few years ago-if you were a peanut butter and jelly sandwich, which part of the sandwich would you be and why?

The bread, of course. I’m all about the carbs!

 To purchase this book, click here.

Thank you, Deborah, for the fun little interview and for designing such a beautiful, encouraging book!  I am looking forward to creating and sewing with my daughter even more this year!