Friday, February 24, 2012

Recipe: Lemon-Mandarin Curd

So, here's the deal.  When I get really, really busy and my brain is in it's craftiest, creativist mode and I start to get overwhelmed, I go to the kitchen.  Not to eat, I go there to make something.  Currently my plate is so full I need to upgrade to a platter just to keep it all balanced nicely.  My To-Do list is out-the-door long and I have about a thousand things that I need accomplish.  Usually sewing is the place that I catch my sanity and regroup my thoughts, but today I didn't have any sewing ready to complete and I needed a way to organize my brain so, I made Lemon-Mandarin Curd.  I think it would be superbly delicious in my recipe for Lemon Curd Sweetie Pies, especially combined with a little blob of the homemade orange marmalade that my mother and I canned.


I used Ina Gartner's Lemon Curd recipe and added mandarin oranges to it.  Here's how I did it:


Lemon-Mandarin Curd

4 lemons
3 mandarin oranges
2 1/4 cup sugar
1 1/2 sticks unsalted butter, softened
6 large eggs
Juice from your lemons/oranges
1/8 tsp salt

Using a veggie peeler, peel the lemon rind, being careful not to get the white stuff (which is apparently called "Pith" and I can't get the word out of my head now that I've heard it).  Peel the mandarin oranges, also being careful of the white stuff (I'm just going to keep calling it that!) but don't worry too much if you end up with some anyway.  I started to scrape it off the orange peels but then realized that there really wasn't enough there to make a difference.  Lemons have really thick white stuff and it's really bitter, so that's why you have to avoid it.  Anyway...


Put the peels in your food processor, add the sugar and then process it until the peels are really super fine.


Add the butter, in cubes to the mixture.


Blend until thouroughly mixed.


Add eggs one at a time.  I always crack my eggs into a separate dish and then plop them in there.  This way I have a better chance of avoiding an egg shell in the mixture, which is always pretty gross.


Next, squeeze the juice out of your fruit, if you haven't already done so,


and add to the mixture along with the salt.


Process for a few seconds and then transfer to a large sauce pan.


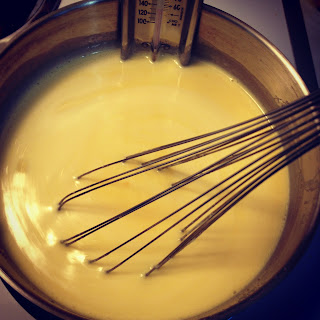
Cook on low heat for about 10 minutes, or until a candy thermometer registers 170*.  Let thicken at room temperature or put in clean, sterilized jars. 


I might decide to hog it all myself or, maybe I'll be generous and give a jar away.  (Probably the small one, ha ha!) 

Now QUICK!!  Go make those cookies!  You'll be glad, I promise!

-Kristi


Wednesday, February 15, 2012

That Birthday Cake (and a recipe, too)


So, the birthday cake...it was A LOT of fun.  This is what it looked like (before I cut into it, obviously).  Pretty, tall and decadent.  No one suspected that, yes, even the cake had the rainbow theme in it.  To me, the cake is, aside from the birthday girl, the star of the show.  It is the the most anticipated thing on the table.  When I cut into this eight layer confection and presented the first piece, the whole room gasped.  It was very gratifying, to say the least.


I love how old-fashioned the colors look, and how uneven the layers are.  Somehow these imperfections were just exactly right.


It only took two boxes of cake mix to make this eight layer cake.  It was pretty simple.  I made one box at a time, then dumped the batter into my 1 quart glass Pyrex measuring cup. 


I scooped one cup out at a time, added a few drops of food coloring and then baked two pans at a time for about 15 minutes.


  I had to make sure to write down my color layers and check them off the list as I went along.  It would have been my luck to make two purple layers or two green, otherwise!

Turquoise is "??" because I wasn't sure how to make that color.  Turns out it's 3 drops of blue and 2 green.
Once every layer was baked and cooled, I froze them until I was ready to assemble the cake.  Frosting them was simple because the cakes were firm and not crumbly.  Because the cake was so tall, I frosted the tops and sides as I went along.  This also made it ideal for filling in any gaps between the layers due to uneven baking.  (The pans had a very thin layer of batter in them!)


I just kept adding layers, being sure to follow my color list from bottom to top, and frosting the tops and sides.


Until finally, the whole thing was assembled.

Isn't it pretty?


So, where is this recipe, you ask?  And what is it for?  It's the frosting, of course!  No one would have believed it was a boxed cake because of this frosting.  It is divine!  Not too sweet, not too get-you-in-the-back-of-the-throat...this is the PERFECT frosting recipe.  I have to thank my sister for giving it to me.  She is a cake making genius, and despite laughing at several of my past attempts of birthday cakes for her (just ask her about the melted goldfish cake.  I mean, I can't help it if her birthday is in July, right?  And my car didn't have air conditioning!) she was still willing to loan me her recipe and then very graciously allowed me to share it with all of you.  What a trooper!  I guess she has a new found faith in my Birthday Cake Skills!  Yay for me!  Lucky you!


Birthday Buttercream Frosting
(Enough to frost a normal, two layer cake, not this monstrosity pictured above.  Be sure to adjust your recipe accordingly!  I used 3 recipes for The Roo's cake.)

1/2 cup unflavored vegetable shortening
1/2 cup (one stick) butter, softened
4 cups sifted powdered sugar
2 tablespoons milk
1 teaspoon vanilla
2 teaspoons corn syrup (optional-I did use it)

Cream butter and shortening together; add vanilla.


Slowly mix in powdered sugar and then add milk until light and fluffy.


  Thin with corn syrup, if desired.  Add a teaspoon of milk at a time if it is too thick. 


*You can always thin it out but not re-thicken it, so be sparing with your milk at the end!*


Thank you for the recipe, Peabrain!


-Kristi


Thursday, February 09, 2012

Boo & A Heart of Gold


This is Boo.  Boo is a nightwatch dog.  Boo has also just recently become the happy companion of one very generous soul all the way across the country in Newport, Rhode Island.  He was sent off with thousands of hugs and lots of little kisses from The Roo who saw me make him and then bravely watched me pack him in a box to send to his new home.  I included a note to the buyer saying that he was coming to her with lots of love already attached because my little girl was going to miss him and wanted to make sure he was going to be happy where he was going.  I, however, had no doubts about Boo being happy because I'd already had several Etsy conversations with this very sweet lady about his creation process and other little conversational bits about life.  I already knew she was an especially kind person just by the emails she sent.  I remember thinking after reading every "convo" that everyone on this earth needs a person like her in their lives, that's how wonderful she was to converse with.  She was truly delightful!  Boo was going to be safe with her, for sure.


After receiving him, she wrote me the nicest message, saying that she was so touched by my my note that she wanted to know if it would be ok if she sent a gift for Roo.  I was pretty sure that she was worried that I might think her request was strange.  I didn't think it was odd.  In fact, I knew that she was a very generous soul, and her only wish was to give my child a gift of love in return.  How could I turn down such an amazing request?  I understand the need to give, my mother and I belong to The Toy Society because we really enjoy making toys just to give them away. 

Yesterday, a package arrived with my little girl's name on it (she was a little excited):


There were two tissue wrapped gifts inside:
and:


You could say that she was one happy little girl!


She loves her new little sweater buddies and I am in awe of my new Etsy friend.  People never cease to amaze me, and to Julie I would like to say thank you, so much, from the very bottom of my heart.  Only every once in awhile does someone come along who restores your faith in humanity.  By bestowing this unbelievable act of generosity, you have given my sweet girl a priceless gift and have shown her early in life that people don't have too be your enemy, like so many others believe.  I am grateful to you for being an assistant in this life lesson.  I know that the world can be a scary place, but I am also trying to teach her that it can be a wonderful place, too.  It's all in how you live your life and how you deal with the obstacles in your path.  Life can either be an inspiring journey or it can be a miserable existence.  We choose our own path with the guidance of the people around us to help pave the way.  I have a feeling that The Roo's path is going to be a beautiful one.  Thank you for being a part of it, Julie!  I am so honored to have met you and I am grateful for your generosity and kind spirit.  My daughter will always know that there is a friendship worth discovering in every opportunity.  These two little sweater buddies will be a happy reminder. 


I hope you are able to find many blessings throughout your days!
-Kristi


"We loved because he first loved us."
John 4:19


Recipe: Caramel Apple Layer Cake with Apple Cider Frosting

This is a recipe that I discovered at my local Whole Foods Market and couldn't resist trying for myself.  I made a few changes to it, so I am giving you my version of their delicious recipe.  If you would like to check out the original, you can find it here.


Ingredients

Cake:
3¾ cups all-purpose flour
1 tablespoon baking powder
1½ teaspoons baking soda
2 teaspoons ground cinnamon
½ teaspoon salt
1½ cups light brown sugar
¾ cup canola oil
¾ cup unsweetened applesauce
¾ cup jarred caramel ice cream topping
2 teaspoons vanilla extract
3 eggs
1½ cups buttermilk
For the Apple Frosting:
7 1/2 cups confectioners' sugar, sifted
3/4 cup (1 1/2 sticks) butter, softened
1/2 cup apple cider or apple juice (I used Simply Apple Juice)
1 teaspoon ground cinnamon
Pinch of salt


Directions

Cake:
  • Preheat oven to 350*.
  •  Grease and flour (or use cooking spray) three (9-by-2-inch) round cake pans; set aside.
  • In a large bowl, whisk together flour, baking powder, baking soda, cinnamon and salt. Set aside.
  • In a second large bowl, beat sugar and oil together with an electric mixer until well combined, about 30 seconds.
  • Add applesauce, dulce de leche and vanilla, beat for 30 seconds, then add eggs one at a time, beating well after each addition.
  • Add flour mixture in three parts, alternating with the buttermilk, and continuing to beat until well combined. 
  • Pour batter into prepared cake pans and bake until golden brown and a toothpick inserted in the middle of each cake comes out clean, about 40 minutes.
  • Set aside to let cool for 10 minutes, then gently loosen cakes and turn out onto a cooking rack; set aside to let cool completely.
 Frosting:
  • For the frosting, put sugar, butter, cider, cinnamon and salt into a large bowl and beat with an electric mixer until light and fluffy, about 5 minutes.
  • Arrange one cake on a large plate and spread about 2/3 cup of the frosting evenly over the top. Arrange second cake on top then frost top and sides of entire cake with remaining frosting.
  • Set aside at room temperature or in the refrigerator for at least 1 hour to allow frosting to set before serving.


Wednesday, February 08, 2012

Photo Of The Day

February 8, 2012

Tutorial: DIY Dessert Stand


Of two things about this party I was sure: one, I was going to make homemade gumdrops and two I wanted an awesome way to serve/display them. I mean, if I was going to go to all that trouble to make them, I might as well put them into something worthy of my time!

I've been seeing cake plates and dessert stands pop up all over Pinterest and figured that I could probably figure out a way to make one myself.  So, with an idea in my head and my husband in tow, we set off for Target where we bought a melamine plate and matching bowl (about $5 for both).  After that, we went to Home Depot to find a way to connect them.  First we looked at wooden dowels but couldn't figure out a satisfactory way to get the bowl to sit up high on it.  We decided on an 1/4" x 12" threaded rod ($1.59 in the plumbing section) and a packet of nuts.  A trip to the craft store yielded a spool of ribbon (on sale for $1!) and four wooden drawer pulls ($0.70). 

(we ended up not using the metal things on the left)


When we got home, my husband got right to work on the project.  First he peeled off the price stickers and placed them in the center of the dishes.


  Next, he measured and marked the centers for both.


Using a 1/4" drill bit, he slowly and carefully drilled a hole through the plate and bowl.  He left the stickers on for this process to help prevent chipping the dishes.


Once the holes were drilled, we could assemble the stand.  But first, we had to glue the wooden drawer pulls to the bottom of the plate so we would know how much room to leave for the threaded rod at the bottom.


Next, he twisted one of the nuts on to the rod and set the plate down onto it.


Next, we decided how far down the rod to place the bowl.


Once we were satisfied with the placement of the plate and bowl, he dabbed a bit of hot glue to the base of the plate and bowl to make sure it would sit nice and sturdy.


Then it was time to make the final touches.  I used a piece of ribbon that I found in my stash to cover the rod.  I applied about 2" of hot glue to the rod and wrapped the ribbon around it.  Be sure to glue in small increments because it dries fast!


Looks good so far, right?


Oh, hello Ollie!  We're almost done, then we can go for a walk!

For the very last touch, I put a dab of hot glue into the opening of a drawer pull and then threaded it on to the top of the rod.  I decided to cover the knob in a piece of ribbon (instead of painting it) and top it off with a bow for extra cuteness.


I think it turned out really well, don't you?  This was a very inexpensive and fun project to do.  It only took us about an hour from start to finish and cost us around $10 to complete.  It would be a fun decoration for any party or wedding and would be especially cool to make and give with your annual Christmas cookies. 

This dessert stand is ready to boogie!

Please feel free to leave me a comment, let me know if you have any questions!

-Kristi