Tuesday, September 03, 2013

Stitch That Stash: It's My Month!

I love Halloween.  I look forward to it all year long.  I LOVE when stores put their Halloween merchandise out, (although my husband's feelings on that is another story, ha ha.)  If it was up to me, I'd start decorating for Halloween on September 1st, but my he won't allow it until October 1st, (he knows I can't wait any longer than that.)  For 31 glorious days I get to deck out my house for my most favorite holiday ever.  So, for my month of Stitch That Stash, I have FINALLY decided on a quilt for my Bee mates to help me create so I can celebrate my favorite day all year long.  SQUEE! 

At first I was thinking of having everyone make Union Jack blocks:
photo from www.creativequiltgirl.com

 Then I thought, maybe a Cog & Wheel:
photo from www.quiltingismytherapy.com


Then I thought, well maybe a Star quilt, where everyone gets to make two different of whatever kind of stars they want in a certain color scheme, maybe something like this (minus the sashing and blue squares):
photo from www.pieceandquilt.com
 Because I was so indecisive, I asked my husband for his opinion, and I showed him the same pictures that I have posted here.  To my surprise, he suggested that I go with my fourth idea, a Halloween quilt.  "When are you ever going to get the chance again? To have your friends help make something that you've always wanted so close to your favorite month ever?" He was right, of course.  So here I am, asking you guys to create Halloween blocks for my month, kinda take a page out of Nicole's book.  Her Christmas In July blocks were so much fun to work on and I loved watching it come together through everyone else's Instagram and Flickr feeds.

 For my quilt, I'd love to stick to white, black, yellow, green, pink, orange, gray etc.  Not true orange, not true green...I think shades of green (split pea, apple, chartreuse) and shades of orange and pink etc.  I prefer a soft, cute version versus scary and bloody. Feel free to use whatever image that you like, jack-o-lanterns, witches, cats, Frankenstein, ghosts etc.  I, personally, love paper-pieced blocks, but have no preference for what you do.  Feel free to use whatever method that you would like.  I have pulled a few images from the web (HA!  Get it??  Web/spider/halloween?...anyway...) for your inspiration:

photo by www.justapost.com
photo by www.artisania.wordpress.com
Halloween Quilt Block
photo by www.kikiquilts.com

I don't have any preference on size or amount that you make.  I am leaving it entirely up to you.  And, by all means TAKE YOUR TIME!  I can hardly expect these blocks to hit my mailbox before October, no way.  Please take your time, I certainly took mine.  Life is busy, especially now that school is back in session.  Thank you all so much for letting me BEE a part of your quilts for the last 9 months.  This is the first bee I have participated in and it was truly a joy.  Have fun!

Happy Sewing!
-Kristi-

Tuesday, June 25, 2013

Tutorial: Step-Up Zig Zag Quilt

This tutorial has been a long time coming.  Twenty weeks to be exact!  Yikes!  How does time just slip away like that??  I don't know, that's one of those questions that just doesn't seem to have an answer.  So how about this, instead of waiting another day to post this, how about I just go ahead and take care of it now?  Seize the moment?  Carpe Diem and all of that?


You might know that I'm a garment sewer first, and a self-taught quilter second.  I've been working on this whole quilting thing for about 6 months now, basically since the beginning of the year.  It was one of my Resolutions for 2013, I wanted to learn how to make a quilt.  So, I tackled it the way I tackle any other project: head-on at full-speed.  I saw a scrappy, zig-zaggy quilt online somewhere and loved the way it looked.  The problem was, there was no tutorial or link or how-to.  I had to break it down and figure it out for myself.

First, I did some math and made a practice square (which I now can't find a picture of) and since it worked out so well, I just went for it.  I went and bought some fabric, took it home and turned it into my third ever quilt top, yippee! 


If you're at all interested in trying your hand at quilting, you should totally give this one a try.  It's fast, easy and pretty darn spectacular when it's complete.  

(Shoot, it's pretty darn spectacular along the way, too, I just want you to finish it.)

Grab yourself 2 1/2 yards of two different fabrics, one light and one dark for a really good contrast and let's get going!

**Make sure to iron your fabric before cutting** 
*Seam Allowances are 1/4"*

-Fold your fabric in half, with wrong sides together and matching the selvage edges; square the end before cutting into strips.
-Cut each length of fabric into 2 1/2" strips.
-With right sides together, stitch one light and one dark strip together down the entire length.
-Place sewn strips right side down on ironing board and press seam to one side.
-Now let's get ready to cut...


Cut strips into 4 1/4" squares; keep each strips squares in their own stack.  This will help keep your project organized later. 


(One row equals one 4 x 4 square.)

Lay your squares right side up, using the above picture for a guide; the first square with the dark strip on the right, the second with it on the bottom and repeat.

**Start with the opposite for the second/every other row, light on the right and bottom**
(does that make sense, I hope??)

(sew seams with a 1/4" seam allowance)

 Press seams to the side as you go.

Continue sewing squares into one long strip; stitch strips together as you get them finished.

Pretty soon, you will start to see your quilt top grown and evolve right before you!
Exciting, isn't it?       

Keep going until you have stitched all of your squares into strips and your strips into rows.  Pretty soon you'll be all done:

Approximate finished size 68" x 68"

So, that was pretty easy, right?  I'm thinking that I might have to come back and update this tutorial with better pictures and step-by-step instructions, but for now I hope this will work.  I'd love if you pinned this/made it/tagged me in a photo etc.  Let me know what you think!

Happy Quilting!
-Kristi-


Wednesday, May 01, 2013

Tutorial: Paper Medallion

Paper Medallion backdrop from Roo's 3rd birthday party.

A very sweet Instagram friend of mine (who lives in Hong Kong) asked me about a button that one of her small friends was wearing.  She wanted to make one, but wasn't sure how to go about it.  She guessed that I could probably help her, and she was right.  I had a quilt to finish and a new pattern to finalize first, now that those things are done, I am finally ready to share the how-to with all of you.

Gather all of your supplies.  You will need three sheets of paper for the medallion, a scrap of contrast paper for the center, a scrap pf paper for the back and a scrap piece of felt.  You will also need 1"and 1/8" ribbon, a safety pin, double sided tape, hot glue and glue sticks, ruler, scissors and a pencil.  (Optional: sequins, buttons, glitter etc.)

Start by measuring and marking all three of your paper to the same size.  For this example, my paper was about 6" square.

Trim to size.

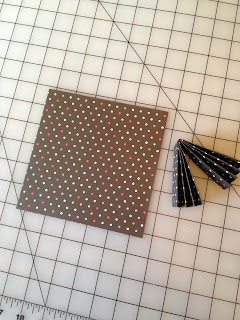
Start by folding your paper in half, this will give you a guideline to use as you fold. Open the paper up again, fold the edge into the center, then the edge to the outer fold.  You will start to see the accordian effect.


In order to make sure the paper medallion doesn't stand too thick off of the wall or as a button, fold the length of your paper again, decreasing the width by half (boy, I hope that makes sense!)


Now, fold the accordian in half, matching short ends and creasing at the center.

Repeat for remaining two pieces of paper.

Place a piece of double-sided tape along the length of the folded paper.


Firmly press two paper pieces together.

Tape the two center folded sides and press firmly to itself; tape the long edge and attach the remaining folded piece of paper (with the center fold already taped to itself.)

You should have something like this.

Now, find a glass or a compass to judge the circle size for the top of the medallion.  I used a pilsner glass and found it was just the right size.

Trace and cut out two circles.

Cut several 4" pieces of 1" and 1/8" ribbon (in this case, I used 10 of each)

Using your hot glue gun, place a bead of glue on the underside of one of your paper circles, about 3/4" inside the edge and press ONE edge of your UNFOLDED ribbon to the glue.

Work your way all the way around the circle.

Run a strip of hot glue across three or four ribbon edges at a time, fold ribbon in half to meet raw edges and cover the glue.

Fold your 1/8" ribbon in half, having the edges slightly crossed; place a bead of glue between the 1" ribbon folds and press the 1/8" ribbon to the glue.  You might want to use a toothpick to avoid burning your fingers.

When you are finished, you should have something like this:
Squeeze out a large blob of hot glue in the center of all those raw edges of ribbon, flip the circle over and place in the center of the accordian circle.

Add a good size dollop of glue to the underside of the second paper circle, flip it over and center it on the back side of the medallion.


Cut three 8" lengths of 1" ribbon, glue one piece to the middle/center of the back circle.

Place a bead of glue on top of the ribbon, arrange second piece of ribbon directly on top of the first, but angled to one side; repeat for last piece of ribbon. 

*Optional-cut four 6" lengths of 1/8" ribbon and arrange on the outside and between 1" ribbon pieces, cover edges with a scrap of 1" ribbon and hot glue.

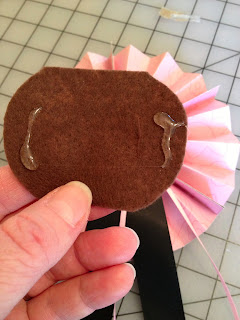
Cut two slits in the felt scrap for the safety pin, squeeze a light line of glue on either side of the slits and apply to the back of the medallion.  Make sure the felt is not flat against the medallion, but instead has a "bubble" or gap in the center.

Trim edges of ribbon in an inverted "V".

Decorate with sequins, buttons, glitter, a photo etc.  You're all done!

Thank you for following along!

Happy Crafting!
-Kristi